
Welcome to My Blog
The latest news about my art, or just some musings that pop out of my head.Beginning Plein Air Knife Painting — You can’t knife paint without a painting knife
Of all the tools in my painting arsenal, the painting knife is obviously my favorite. With a painting knife, I can apply paint, spread paint, smooth paint, rough up paint, blend paint, and scrape paint. I can use it to apply a skinny line of paint to indicate twigs, a roof line, brick mortar, street lines, fences, tall grass, or anything I need a real thin line for. Now some very small details may not be possible with a knife and there are times you may reach for a brush for a certain effect. Still, first and foremost (at least for now), I’m a happy knife painter.
The art supply store near me has a rack of many kinds of knives. When you first see them, it may be intimidating and you may not know which knife to pick up first. Your worries are over. I’m here to help you.
First of all, some people call them palette knives, but that’s not really accurate. A palette knife is a knife you typically use to mix paints and/or scrape unwanted paint from your palette. It’s not very good for painting. Let me show you what a painting knife looks like to help demonstrate why.
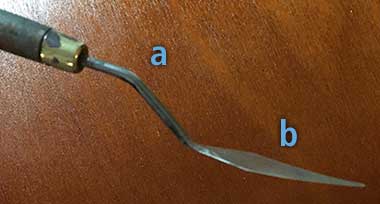 The letter (a) shows the bend in the handle. Make sure the knife you buy has this bend in it. This is so you can hold it by the handle and apply paint without your knuckles touching the canvas and messing any paint applied to it earlier. A palette knife doesn’t have this bend since it’s just for scraping and mixing. I’ve never owned a palette knife. Painting knives can take care of all my palette knife needs. Another important feature to look for in your painting knife is (b) a flexible tip that won’t break when you bend it.
So let’s check out a variety of painting knives and pick the right one for you to start with. Every time I hit the art supply store, I check out their variety and sometimes find myself buying a new type to try out when I paint next. Sometimes, I like the new one and sometimes I find out it was a useless purchase. Let’s see what I currently own:
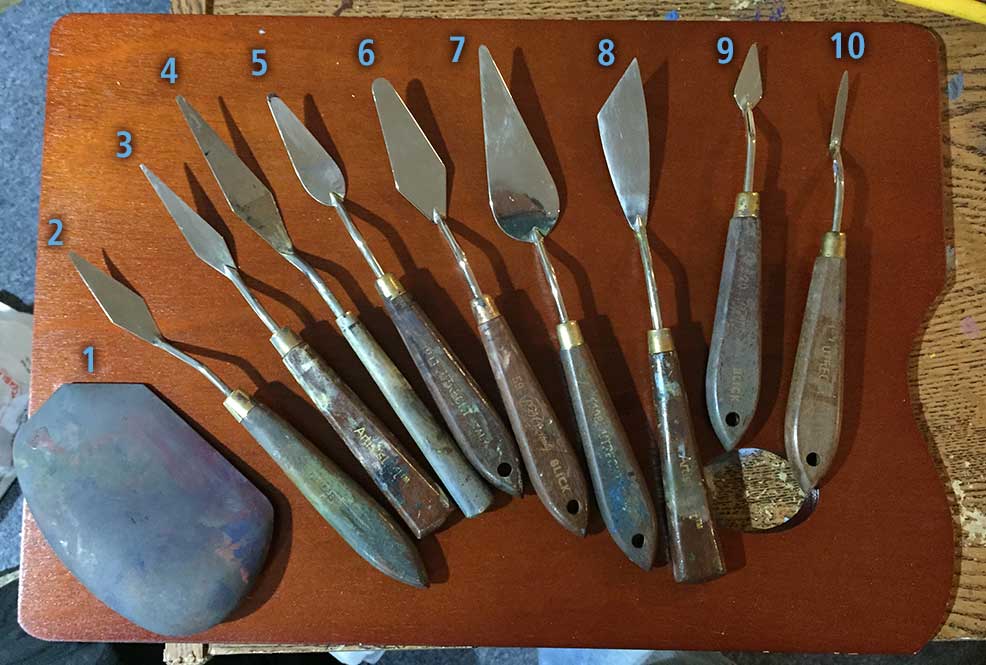
- This isn’t a knife at all, but a nylon wedge. Still, it’s a lot of fun to use to apply lots of paint on a larger canvas or to scrape paint around.
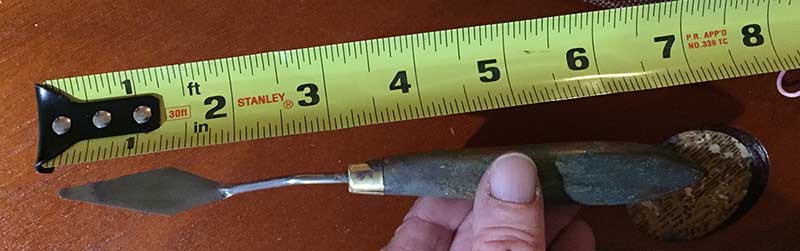
- This was my first knife I ever owned and is my favorite knife of all. I bought it for a beginning painting class in 1987 and it’s still the knife I use the most. I have no idea what size it is. I’ve posted another photo on the top of this blog to show you how large it measures. As you can see, it’s trowel shaped and you can use it like one would use a cement trowel – although on a smaller scale. This would be the knife I recommend you buy first due to its extreme versatility. Since most plein air paintings are relatively smaller than paintings you may paint in a studio, you can easily paint a plein air in 2-3 hours with just this knife. The side edges can give you nice thin lines. It’s also a good knife for mixing paint. I’ve used this knife so much, it’s razor sharp from being scraped on many canvases and panels. And, yes, I’ve cut my fingers on it a few times. Be warned.
- This is a longer version of my favorite knife.
- This is an even longer version of my favorite knife. The longer versions are especially handy if you want to make long thin lines.
- I read this one artist who recommended knives with rounded edges instead of sharp ones, so I bought one. I don’t find I use it very much. I like the sharp edges to help my out with sides of buildings and such.
- This is a larger version of the rounded knife and, again, I don’t find myself using it very much either.
- I do find myself using this large version, though! Especially when I work larger. I love loading this knife up with a lot of paint and going to town scraping and flinging paint fast. It makes for a lively painting and I don’t use this knife enough on my smaller panels when I go plein air. If I allowed myself to loosen up and not worry about small details, I bet I could get a very lively painting in a short time!
- Again, an artist I watched online really enjoyed painting with this knife, but I don’t care for it that much. It’s probably good for doing buildings and such.
- This is a smaller version of my favorite knife. Probably good for details. I use it every so often if I need a small dab of paint.
- I have no idea what this knife is good for. It seemed like a good idea at the time when I was purchasing it, but it holds so little paint, I can’t do anything with it. Definitely avoid this one.
There you have it. Like I said, I recommend knife no.2, although a longer version like nos. 3 or 4 might not be bad to add later. If you want to loosen up or paint larger, go for no. 7 or even the nylon wedge.
As for cost, we always hear you get what you pay for, but I’ve never gone for the most expensive knives. I’ve seen knives online for as much as $60-$90 each. Yikes, no thanks! The ones I buy are about 7 bucks each and they work fine for me. Again, I’ve recently discovered a terrific knife artist who uses only inexpensive plastic painting knives. I’ve never tried them. They look like they would break too easily. Plus they don’t come in the different varieties I’d like.
Well, I sure rambled a lot about knives when I ended up just recommending one kind. As you can tell, I’m pretty passionate about them, though. Here’s hoping you feel the same once you try them. But before you do, I have a few more supplies to recommend for you, which I’ll take care of next blog entry. After that, we get to try them out. See you then!
Beginning Plein Air Knife Painting — What colors do I need?
When painting plein air, you want to bring as little with you as possible. This applies to your paint, as well. A limited palette is highly recommended. In my opinion, that would be a tube of each of the 3 primaries, a brown, and white. Here’s some suggestions for a beginning palette. Later on, you may want to modify and/or add to it.
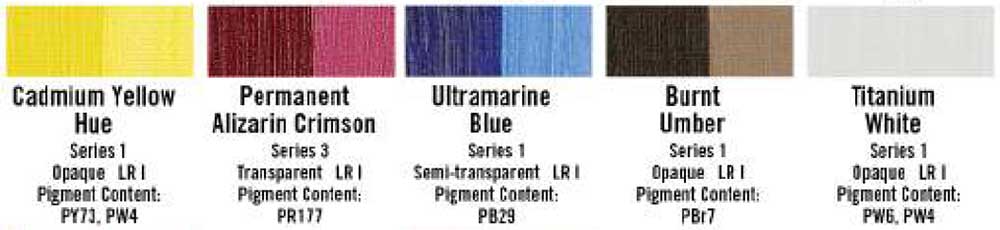
Cadmium Yellow. A good, basic yellow, it makes terrific greens, oranges, and golds. It can be toned down with brown to make nice ochres.
Permanent Alizarin Crimson. A cool, transparent red, it makes nice oranges when mixed with yellow and nice purples when mixed with blue. It’s terrific for darkening and/or toning down your greens.
Ultramarine Blue is a very versatile blue to start with. It plays well with the other colors, making nice greens and purples. On its own, it mixes well with white for your sky blues.
Burnt Umber. I like to include an earth color and burnt umber would be the one I’d start with. Again, it’s versatile. Mix it with blue and you get a terrific black. Add white to that mix for nice grays. Add more burnt umber to the gray mix for a warmer gray; add more ultramarine blue for a cooler gray.
Titanium White is a terrific opaque white. I can get chalky looking if overused, so I personally like to buy white that’s a blend of mostly Titanium White and some Zinc White. Do not buy Zinc White on its own. It’s very transparent and won’t lighten your colors unless you use a whole lot. Zinc White by itself is best left for hardcore studio artists who use it for luminous effects like skin in their portraits.
Once you have these colors and have worked with them a few times, you may find you’ll want to add colors to your palette. For instance, I sometimes use a warm red like Cadmium Red instead of Alizarin Crimson. Mix a little into greens to get interesting olive colors. Sometimes, I’ll bring some Sap Green or Viridian if I know I’m going to use a lot of green in my painting. I often use Burnt Sienna instead of Burnt Umber if I want warmer browns in my scene. The more you paint, the more you’ll figure out your own favorite limited palettes.
If you don’t have any paints at all yet, you can buy paint sets to start out. Here’s a 6-color set from Blick that costs less than $15.
Some final thoughts:
- Whatever paints you do end up getting, make sure they’re not student grade versions. Seriously, go for the good stuff. Student grade paints don’t have the level of pigments the professional stuff has. You’ll find yourself getting very frustrated when your paints don’t cover the layer below well.
- When picking out any colors, look on the label for its Lightfastness Rating to determine how permanent the color is. Make sure it says I. Stay away from II or III. Those colors may fade or change on your painting after time.
- Stay away from Pthalo Green, Pthalo Blue, or Prussian Blue at first. Those paints stain like crazy. Once you apply them to your painting and then try to paint over them, you’ll find those colors will stain anything they come in contact with. If you do use them later on, use them sparingly and carefully.
- No need to buy black. Mixing Ultramarine Blue with Burnt Umber or Burnt Sienna makes a richer black. No need for oranges or purples at first either. It’s always better to learn how to blend them at first. Later on, if you feel the need for them, you can always buy them.
- If you like paint texture, try to find a brand with thicker paints. I personally love the Utrecht line of paints due to their reasonable prices and thick paint.
- Don’t buy any paint mediums. They’re not needed for beginning plein air painting. When you get the feel of it, then you can explore mediums that suit your needs.
- Knife painting can use a lot of paint. Once you’ve painted a few and know the colors you like to use, definitely go for the larger tubes. They’ll save you money in the long run.
Next blog, we’ll talk about the painting knives themselves.
Beginning Plein Air Knife Painting — Acrylic Paint or Oil Paint?
So what kind of paint do you want to use when you go out to paint plain air — acrylic or oil? Let’s do some comparing.
Acrylic paints
Acrylic paints are basically polymer with pigment. They’ve definitely got some nice advantages over oil paints:
- They dry quickly. When you’re done with your plein air acrylic, the painting will probably be dry by the time to take your set-up down. No worries about getting paint accidently all over your car or clothes throughout the day and beyond.
- Because of their fast drying time, it’s easy to cover up mistakes or to put an opaque layer on top of paint underneath.
- You don’t need solvents. If you work with brushes, you just need water to rinse them, and water and soap to clean them afterward.
- Acrylic paints generally cost less than oil paints.
So what are the disadvantages?
- Acrylic paints tend to dry darker than when you apply them. Not only does this alter the look of your painting, but it can make it very difficult to mix and match a certain color on the painting after it’s dried on your painting.
- Because of their fast drying time, it’s very difficult to get beautiful wet-on-wet effects. Once the paint on your painting is dry, you can’t work fresh paint into it for painterly blending effects.
Oil paints
I’m going to start with the disadvantages first.
- They can’t clean with just water. If you use brushes, you have to bring solvents with you. Personally I hate dealing with solvents like turpentine and mineral spirits and the like. But you can get away from having to use them by painting with knives like I do. When I want to clean my knife, I just wipe it with a rag. (There are water-soluble oils and I’ve read good things about them, but I’ve never tried them. I’m too cheap to buy a new set of paints.)
- Oils take longer to dry. Although there are mediums you can mix with them to cut their drying time dramatically, your painting will not be dry when you’re done in a plein air session. If you paint thickly with knives like I do, they can take weeks to dry to the touch and maybe a year to dry completely.
- They can be more expensive than acrylic paints.
So why would you want to paint with oil at all? Well, they have some wonderful advantages over acrylic.
- Their colors are richer.
- When they dry, their colors don’t change.
- They have a nice, creamy texture when you spread them on your panel or canvas.
- You can get gorgeous wet-on-wet and/or wet-in-wet effects.
- Since they dry slowly, you can paint an area, go to a different section of your painting, and then still go back to that first area to blend into it.
What to choose?
Lots of beginners start with acrylic. I was one of them due to all of its advantages I pointed out already. Acrylic paints are very easy to work with. So why did I switch to oils?
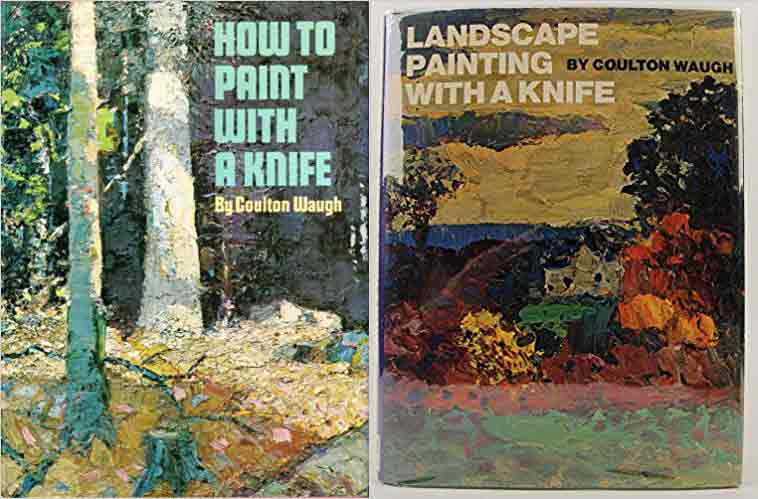
I bought the 2 terrific knife painting books by Coulton Waugh and he was a big proponent of oils over acrylics, mostly because of the beautiful wet-on-wet effects he got in his paintings. His books are called How To Paint With A Knife and Landscape Painting With A Knife. They’re, unfortunately, out of print, but you can get them used on Amazon. Anyway, I did a few exercise from his book and was intrigued.
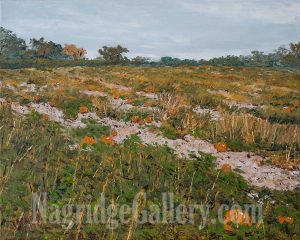
My first oil knife painting was this 20″ x 16″ studio painting on canvas of a Pumpkin Patch, based on a photo I took.
I then did a knife painting of a pumpkin patch using some of the techniques I learned in the book. I found the oil paint a lot harder to control, so I stuck with acrylic for plein air.
A few months later, a knife oil painting workshop with Kim Rhoney (who I’ve talked about before on this blog) set me even more strongly on the path of knife oil painting.
The moment that finally solidified it with me was painting with the Michigan Plein Air Painters on a summer day. It was so hot, the acrylic paint was drying on my knife before I could apply it to my canvas, making for a very frustrating experience. The next time I painted with the group, I painted with oil and I’ve rarely gone back to acrylic paint since.
If you’ve never painted before and are nervous about starting, maybe you should try acrylics. But, if you’re feeling brave, then go for the oils! If you start learning with oils, you may feel less frustration with them, as opposed to someone who’s used to working with just acrylics. You’ll learn right away the properties and feel of oil paint and think that’s what painting is supposed to be like, as opposed to an acrylic painter who’s used to their very different properties.
If you don’t have any paints yet, don’t buy any until you read my next blog. I’ll give my suggestions on what colors to buy. You don’t need as many as you might think.
Beginning Plein Air Knife Painting — Canvas or Panel?
When most people think of painting surfaces, they think canvas! If a painting isn’t on canvas, it can’t be a real painting, right?
Well…actually, canvas may not be the best surface for oil paints. If you were to paint directly on raw canvas, the canvas would rot and the painting would fall apart. That’s why artists add a coating to the canvas. If you’re hard core, you coat it with rabbit skin glue (yes, it’s made from rabbit skin) and lead white. It’s a lot of trouble and not something you want to do with poor ventilation. But done right, it’s supposed to give a very smooth surface, perfect if you like working slowly with tight detail.
If you’re not a super duper professional, you’d probably coat your canvas (or buy canvases already coated) with acrylic gesso. That was my standard coating for many years, and still is when I paint on canvas.
The past couple years, I’ve switched to painting on panel. They’re more easily transportable, and inexpensive. I used to buy them, but the cheapskate inside of me bristled at paying 3-4 bucks a board. Now I make my own for like 90 cents each, and they work great.
I love watching YouTube videos by other artists. One of my favorites is Stefan Baumann. I can’t recommend his videos enough. They’re incredible informational about the technical parts of painting, as well as inspirational. He deals with every aspect of painting, including the Golden Mean, composition, lighting, plein air, supplies, color, subject matter, abstraction, realism, etc., etc.
The reason I bring him up is that he also has terrific videos all about canvas and panels. Stefan’s the one who taught me that acrylic gesso is basically little more than common housepaint in composition. If you’re going to paint on panels, then there’s any easier method to coat them. I’ve posted his videos that explain all this in detail at the end of this entry, but I’ll summarize how I make my panels here.
First, I go to a local hardware store with a lumber yard and buy a 4-foot by 8-foot sheet of 1/8″ thick MDF board. (I’ve read untempered Masonite hardboard works too, but my lumber yard only carries the tempered type, which isn’t supposed to work well.) The reason I choose the 1/8″ thickness is because that’s the thickness my pochade box and my drying box hold.
The lumber yard offers cutting services, so I have them cut a couple 16” x 20” pieces from the sheet. Then from the rest of it, I have it cut up into 11” x 14” boards. I take home any of the scrap and cut them up later at my house with a common saw. I usually walk out of there with over 2 dozen panels.
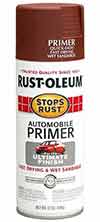 Inside the hardware store itself, I buy 3 cans of basic primer spray paint. I usually buy a red, brown, and green paint. When I get home, I lay a huge tarp in my garage and spray a coat of the spray paint on each board. I paint some brown, some red, and some green. When they dry, I give them a second coat. When that dries, they get a third and final coat. Sometimes, I mix colors between coats. This gives some interesting neutral colors. If the spray paints in your store aren’t a color you like to tint your panels with, then you can always spray paint them white and tint them when they’re dry with whatever method you prefer.
By painting the panels in color, I not only give the panel a coating to paint on, I already have them tinted. I tint all my panels and canvases for three reasons:
- It’s easier to judge my colors on a neutral background. A dark color looks too intense on a white background. A light color is hard to see. Since painting involves playing a color against another for effect, it’s easier to see the correct color if it’s on a neutral base.
- It looks amateurish to have spots on your surface that’s unfinished when you’re done painting. But, if it’s tinted, you’re guaranteed of having paint on every part of your surface.
- Sometimes, artists purposely let the undercoating show a little bit all over the painting. If you have a red tint on the surface and paint a lot of green trees, the red that shows through can add energy and sparkle to the green. Plus the bits of red all over the surface can add harmony and unity to the color scheme.
Another good tip I learned from Stefan Baumann is to pick one size of panel and stick with it. For plein air, I almost always paint 11” x 14” panels. I purposely bought an easel that accommodates it. I have a drying box that also accommodates 11” x 14” panels. I can carry unused as well as finished paintings with it when I’m on a painting vacation. I don’t have to worry about transporting wet paintings, like I would if I had different sizes. It also makes it easier when buying frames.
Don’t I ever paint on canvas? Sure, if I work large. Panels don’t work well larger than 16” x 20” because they’re too heavy and can tend to warp if you don’t attach braces to the back. Rather than deal with that, I’ll go for a nice canvas from the art supply store or even stretch my own. In that case, I do use acrylic gesso. Since this entry deals with plein air specifically, I won’t go into any more detail on that right now.
What I will do is end this entry with Stefan’s videos. If you like them, feel free to comment on his YouTube channel and let him know who sent you. It’s not like he knows me or anything, although I would love to take a workshop from him one day.
Next blog, we’ll talk about paint. See you then.
Beginning Plein Air Knife Painting — The Easel
If anyone reading this blog is curious on how to start plein air painting and/or painting with a knife, I thought I’d share some tips I’ve gathered since I took it up. If you’ve never attempted plein air painting, I hope these entries will give you information and inspiration to start. If you have done plein air painting, I welcome any comments or feedback on your experience that you’d like to share. The tips will concentrate with painting in oil or acrylic paints.
Since they’ll be your most expensive investment, I’ll start with easels. When going out to paint outside, you want to use an easel that’s easy to carry, easy to set up, and, most importantly, easy to take down. You never know if Mother Nature will force you to stop painting and head quickly for shelter. Your easel should be sturdy. It should be able to easily accommodate your favorite sizes of panels or canvases that you like to work with. It should have an area to accommodate a palette with paint. It should be easily adjustable so your painting surface stays level and easy to reach, whether you like to stand or sit while you paint.
Perhaps the easiest type of easel to find in an art supply store is the French easel. They’re like mini wooden suitcases with legs. They can sometimes allow the artist to transport one or two wet canvases when you’re done. The main area often has room to carry your paints, knives, and other materials. The outside section has handles that allow you to carry it like a suitcase, and sometimes come with straps that allow you to wear it like a backpack.

Hard at work on painting, using my bulky French easel. Photo taken by artist Sharon Ross Cullen.
The biggest disadvantage, however, of the French easel is its weight. Mine weighs around 13 lbs. when it’s empty and a lot more when I fill it with supplies, which makes it difficult to carry for a long distance. When I’m in the mood to hike a mile or more for a beautiful location, I find it an unpleasant experience to lug this wooden thing. It’s also not that quick and easy to set up or take down.
You can get a cheap version for a little less than $100 on sale. I’ve read many accounts of how the cheap versions break down easily. They say, if you’re going the French Easel route to make sure you get a Jullian brand. They’ll cost a lot more, but may break less often.
That may be so, but I bought the Dick Blick version on sale, and it hasn’t broken for me yet, aside from a screw— and that was just an easy replacement at my local hardware store. In fact, I bought a dozen spare screws and wingnuts for them, and keep them in the easel’s main compartment just in case. Because of its reasonable price, it was my first plein air easel for 3 or so years. After painting alongside plein air painting veterans, I noticed they used lighter, more professional setups.
A lot of those artists swear by their Soltek. It looks like a lighter, smaller aluminum version of a French easel. It has the legs attached to a small compartment. The compartment is where you store your palette and paints. You carry most of your supplies in a separate bag. It’s seems quick and easy to set up and take down, but I’ve read reviews of how the legs can sometimes give trouble if you get sand or dirt in them. I’ve never worked with one, so I have no strong opinion on it either way.
Most artists like to use a pochade box that affixes to a tripod. I’ve read terrific things about Open M, Alla Prima, and Strada versions of poached boxes. Guerilla Boxes look sturdy, but they also look too heavy. The pochade box usually has a metal plate on the bottom that clamps easily onto a typical photographer’s tripod. The inside of the box carries the paints and supplies, and/or a palette on the bottom for mixing your paint.

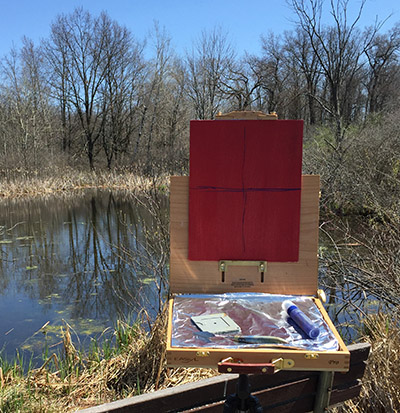
My lightweight, easy to use EasyL Pro pochade box with tripod ready for me to paint on it on a beautiful winter day at the tip of the MIssion Peninsula, MI.
The one I settled on was the EasyL Pro. It’s very lightweight, reasonably priced and even comes with a tripod, which attached to the metal plate installed onto the pochade itself. The EasyL Pro allows me to carry two 11” x 14” wet panels on its side. It doesn’t have as much room as my French easel for supplies, but it’s so lightweight, I don’t mind carrying the rest of what I need in a backback. The bottom wood surface in the inside can be used for a palette, or you can glue a piece of glass inside of it with caulk. I use a separate board for my palette. The only criticism I have is that the tripod that came with the pochade box is too large to fit in my backpack. I’m thinking of buying a good tripod in the future that folds down small enough for the backpack.
There are many other brands of plein air easels and pochade boxes, and I highly recommend you search reviews about the different types. Figure what’s most important to you in terms of features. If you don’t like to paint large, don’t buy the largest version out there. There are lots of great pochades that can fit, along with your paints and supplies, in a basic backback. Talk about easy to transport! (I can’t emphasize enough the importance of packing as light as you can.)
If you’re ready to commit to plein air painting, buy the best you can afford. If you’re wary of the investment because you’re not sure plein air painting will be your thing, some artists have built their own painting systems with wooden cigar boxes or even pizza boxes. With YouTube and Google, there’s no excuse on obtaining a good easel that works for your needs or budget.
If you have any questions or comments, please let me know in the comments section and I’ll address them in a future blog. Next time, I talk about painting surfaces.
Welcome to my new (improved?) website!
 My old website of my art is long gone. Here’s my new more-mobile friendly version.
I still have tinkering to do with it, but, for the most part, I think I have all my stuff in place. There’s some art to see, but I hope to update with new work as I finish them. There’s also plenty of art from the past 2 years to add, as well.
The even bigger news is that I’ve also just opened my new Etsy Shop, where you can buy my paintings directly from me.
As for this site itself, I hope to add a video of me working on a painting later this year. If you have any feedback on the site or of things you’d like to see on it, by all means, contact me. I’d love to hear from you.
Recent Comments