by John Nagridge | Jun 26, 2017 | Beginning Plein Air Painting
Now that we have our supplies we’ve discussed (an easel, canvas or panel, the paints, your knives, and everything else), let’s start a plein air painting. I’ll show you how I worked on an oil knife painting yesterday.
Choosing the scene
First, you have to decide where you’re going to paint. Maybe there’s a nice park or body of water you can travel to. Usually, I don’t mind driving a little bit to get to a more picturesque location. But in my case yesterday, time prevented me from going further than my own back yard.
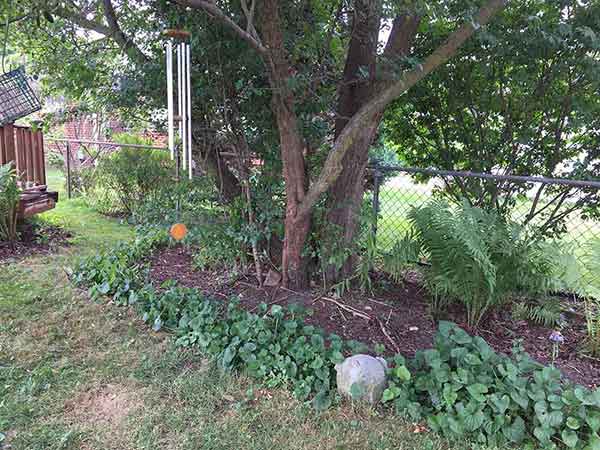
Once I’m at my chosen locale, I get my supplies out and carry them with me. (This is why I don’t want to over pack. It gets difficult lugging all the supplies around if my backpack is too heavy.) I walk around my chosen area until a scene inspires me. For this painting, I chose a Hawthorne tree in my back yard. I love the multiple, undulating trunks with the thick foliage of leaves that shade the ground. Hanging on one of the limbs is one of my wife’s wind chimes that I want to include. The scene is backlit by bright sun, which help define the trunks in shadow. On the ground is a cement bird stage, although I’ll just interpret it as a simple rock.
Composing the scene
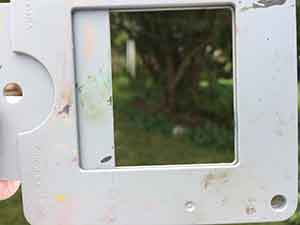
I use my viewfinder or even a cupped hand to help me crop a nice scene from the surroundings. I don’t rush this part. If the scene doesn’t inspire me, I’ll end up doing a painting that looks like I’m bored. I use your viewfinder, turning it so the rectangle opening is sideways. After looking at different possible compositions, I then turn it so the opening is vertical. I always give myself many options on what to paint. When I find a composition through the viewfinder that excites and inspires, I’m ready to start.
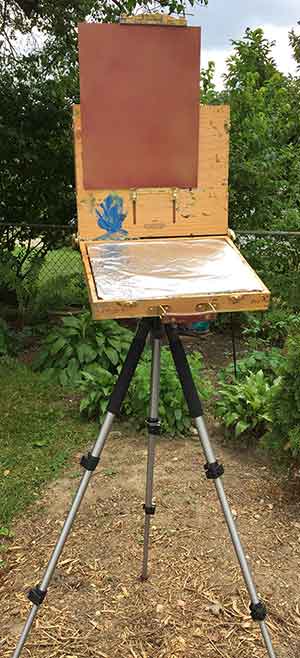
First, I unload my supplies into the ground. I set up my trip-pod and easel. The composition I chose is a vertical one, so the panel is inserted in a vertical format.. Being right-handed, I have the easel to the right of the scene I’m painting. I set the panel closer to the left edge, so it’s closer to the scene.
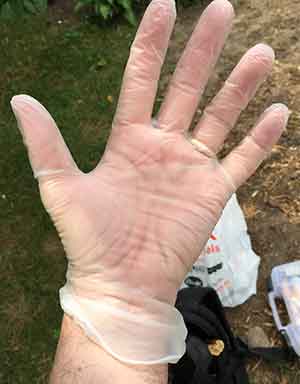
Since I don’t like to get paint on my hands, I put on a pair of my medical gloves. This will save me a lot of time later for clean up. Now I need together a sketch onto it. Usually, I like to do some thumbnail sketches first, but, again, time prevented me. (In a future blog, I’ll in detail why doing thumbnails is a great idea.)
Making my sketch
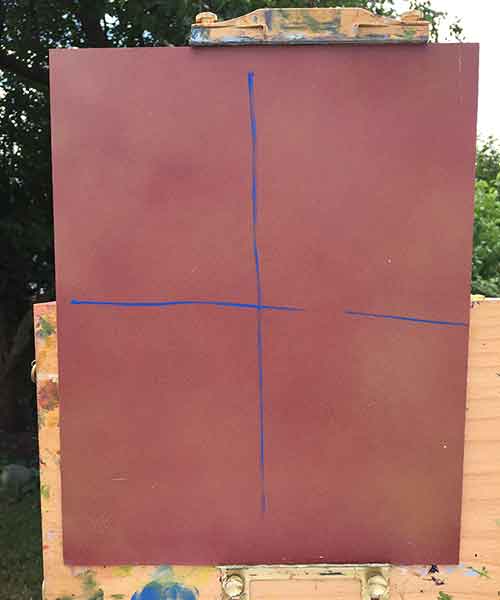
I need to get a drawing on my panel first. When it comes to composition, there’s many schools (rule of thirds, the Golden Mean, etc.). Since I need to work quickly on a plein air painting, I keep it simple. I draw a line in the center horizontally and vertically with my acrylic paint marker. These will be the areas I try to avoid putting and focal pints or major elements in. For instance, I always put my horizon line above or below the horizontal center line. I always put my focal point to the right or left of the vertical center line. This makes my composition much more interesting.
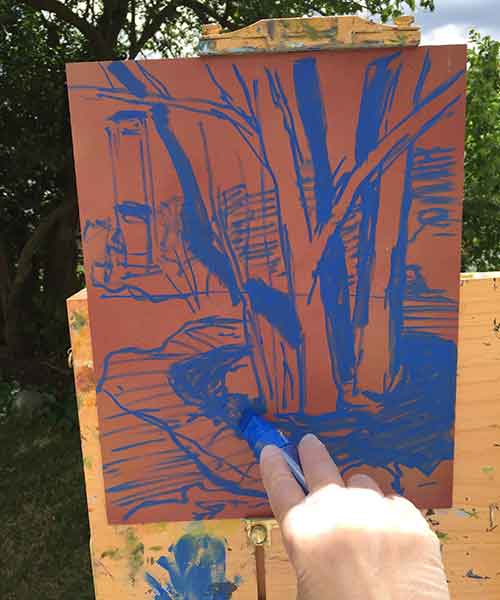
Using the acrylic paint marker, I draw the shapes simply and carefully onto my panel, looking through my viewfinder at the scene. This helps me keep the elements I’m drawing in the right proportions. When I’m happy with the shapes, I sometimes block in shadows to make sure I have a nice balance of lights and darks. Once I have the drawing done, I set up my pallet of colors. By the time, I have them arranged, the acrylic paint drawing will easily be dry enough to paint on top with my oil paints.
Setting up the paints
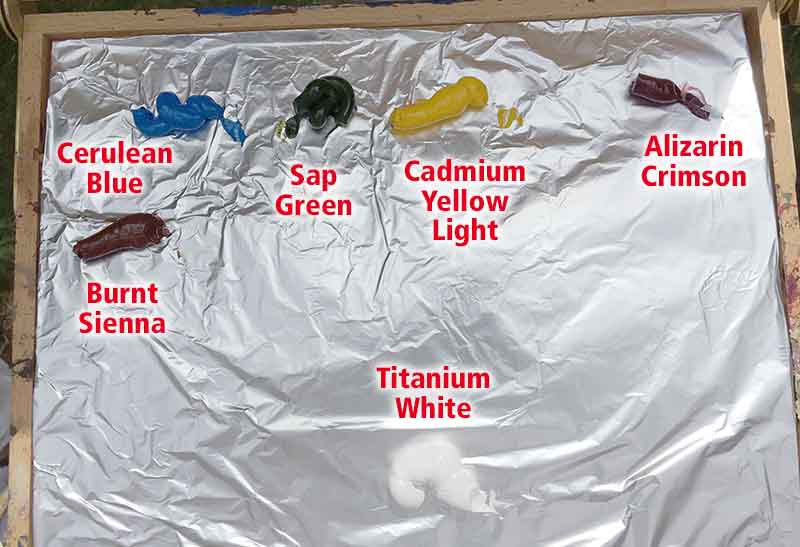
The photo above shows the palette I used for the painting. I typically have used Ultramarine Blue as my blue in most of my paintings in the past, but lately I’ve switched to Cerulean Blue, which helps me achieve brighter greens. As for the arrangement of the colors, it’s not one I’ve seen used by most artists, but it’s worked for me. I make sure to keep the same arrangement every time I paint outdoors, so I never have to hesitate picking up paint since I know where my colors sit at all times. I make sure to squeeze a decent amount of paint. Knife painting uses a lot more paint than brushes do and I don’t want to waste time bending down and squeezing more paint onto the palette.
What’s the rush?
I mentioned a few times about not having a lot of time, so let me elaborate on that. When I pick a scene a paint, a lot of the elements that interest me are the shapes of the shadows and the sunlight. The sun moves across the sky pretty quickly and 30 minutes later, I’ll find the shadows have changed dramatically. The first half hour of painting is crucial, and a lot of the painting afterward is based on memory. Plus, I find my mental energy drains after 3 hours of painting. I don’t want to apply paint if I’m losing enthusiasm for the painting. Lastly, there’s the fickleness of Mother Nature. When I started my painting yesterday, it was bright and sunny, but a couple hours later, it became very cloudy and started to drizzle a bit. I finished my painting before it started raining hard a couple hours later, but one can never truly predict weather throughout the day — at least not in Michigan!
It’s cliffhanger time!
I have the drawing on my panel. I have the paints set on my palette. I get a rag in my left hand and my painting knife in my right. But we’ll have to wait until the next blog entry to see me paint. Catch you then.
by John Nagridge | May 4, 2017 | Exhibit
I’ll be exhibiting a few of my knife paintings at the Ukrainian American Archives & Museum of Detroit on Saturday, May 13, 2017. They’re having a special preview tour of their new location on 9630 Joseph Campau in Hamtramck, Michigan. Donation at the door is $25, and includes a guided tour of the new facilities as well as refreshments. You can get more details at their website or on their Facebook page.
I’m thrilled and honored to be a part of the show that includes Ukrainian artists I greatly admire, including my high school art teacher, Luba Kytasta. She was a strong and supportive influence and I can’t wait to see her and her art that day.
This is my first show of 2017, but hopefully not my only one. If you can make it, please be sure to say hi.
by John Nagridge | Apr 9, 2017 | Beginning Plein Air Painting
Let’s finish off talking about what basic things you need to start Plein Air Knife Painting that haven’t been touch on yet.
- A palette. This is just a surface to lay your paints out on. Sure, you could buy one of those nifty wooden or plexiglass boards with a hole in it for your thumb. I have a few of them, but stopped using them after some paint fell off it onto my floor, while I was walking back to view my painting farther away. Plus I got tired of having to clean my palette after every paint session. Now, I just use a piece of spare wood or MDF board and wrap it with aluminum foil. When I’m done painting, I just carefully peel the foil off, ball it up and dispose of it. The palette itself stays clean. If you want to try it, make sure the shiny side of the foil faces the wood. That way the paint is applied to the dull side and is easier to see.
- Rags and/or paper towel. The great thing about painting with a knife is that you don’t need solvents to clean the knife. But you do need something to keep wiping it clean. Never let paint dry on your knife! And if you want to keep your colors on your palette clean, wipe your knife often before picking up more paint. When your painting session is done, wipe down the easel lips that held your panel. Put the paper towels and rags on top of your used palette with the foil. When you remove the foil, the rags stay inside.
- Disposable medical gloves. You’ll be very happy you wore these while you paint. When you’re done painting and cleaning, peel them off and dispose with the foil and rags. Your hands will be mostly clean.
- Gojo Hand Soap. For any areas of your hands or skin that did get paint on them, buy this strong, waterless soap from your local auto supply store. Very handy especially if you paint in areas with no sink nearby.
- First Aid Kit. Thank you, Laurie Sharkus (Animal Sculptor Extraordinaire!) I told her how I cut myself painting on one of my painting knives and she gave a smart suggestion of including a simple first aid kit. This is one of those items that don’t occur to you until you’re out in the woods and really wish you had it.
- Pliars. To help open those tubes of paint when the screwcap is stuck. Also handy when the screws of your easel are too tight to loosen when you’re setting up or taking down your easel.
- A pencil. Here’s a great tip from artist Kim Rhoney on how to sign your painting. I like to make sure there’s a section of thick paint with mostly solid color in one of the lower corners of the painting. When I’m done, I use the sharp point of the pencil to emboss my signature into it.
- Small sketchbook and pen. To make thumbnails and value sketches of possible scenes to paint. Once I have a thumbnail I like, I redraw the thumbnail onto my panel.
- Acrylic paint marker. This is what I use to draw my sketch onto my panel.
- Viewfinder. Essential tool to help me compose my scene for my painting.
- Drinking water and snacks. This helped save one of my paint days last fall. I did a morning painting and then packed up for lunch. My car was a couple miles away. On my way back, I saw another scene I wanted to paint, but I was too hungry. I knew if I hiked all the way to the car and went to lunch, I wouldn’t be motivated to return and do the 2 mile hike back to this scene. Luckily, I had a couple granola bars and water packed. That was just enough to curb my appetite and stay at my location to do the second painting. That painting ended up being the best one I did that day.
- A backpack. To pack all this stuff in, of course.
- A hat or baseball cap. The brim will help keep the sun out of your eyes, and thus help you see your colors of the paint more clearly. Make sure it’s a hat you don’t mind getting paint on. That happens accidently at times. For that matter, make sure that anything you’re wearing is clothing you don’t mind if paints gets on.
- If you paint with acrylics, you may also want to have a clean plastic jug to bring water with you, as well as a spray bottle of water. With the spray bottle, you can spritz the paints on your palette every so often to keep them from drying while you use them. You’ll need a small container like a jar or a small bucket to have water to rinse your knives in to help keep them clean. Don’t leave the knives in the water. You don’t want the metal to rust, nor want you wood handles to warp.
These are pretty much the essentials I bring when I go plein air painting. Some of the items fit into my pochade box (the panels, knives, viewfinder, pencil for signing, palette) and the rest go into my backpack.
Now we’re ready to go plein air painting!
by John Nagridge | Apr 3, 2017 | Beginning Plein Air Painting
Of all the tools in my painting arsenal, the painting knife is obviously my favorite. With a painting knife, I can apply paint, spread paint, smooth paint, rough up paint, blend paint, and scrape paint. I can use it to apply a skinny line of paint to indicate twigs, a roof line, brick mortar, street lines, fences, tall grass, or anything I need a real thin line for. Now some very small details may not be possible with a knife and there are times you may reach for a brush for a certain effect. Still, first and foremost (at least for now), I’m a happy knife painter.
The art supply store near me has a rack of many kinds of knives. When you first see them, it may be intimidating and you may not know which knife to pick up first. Your worries are over. I’m here to help you.
First of all, some people call them palette knives, but that’s not really accurate. A palette knife is a knife you typically use to mix paints and/or scrape unwanted paint from your palette. It’s not very good for painting. Let me show you what a painting knife looks like to help demonstrate why.
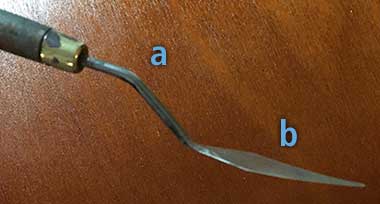 The letter (a) shows the bend in the handle. Make sure the knife you buy has this bend in it. This is so you can hold it by the handle and apply paint without your knuckles touching the canvas and messing any paint applied to it earlier. A palette knife doesn’t have this bend since it’s just for scraping and mixing. I’ve never owned a palette knife. Painting knives can take care of all my palette knife needs. Another important feature to look for in your painting knife is (b) a flexible tip that won’t break when you bend it.
So let’s check out a variety of painting knives and pick the right one for you to start with. Every time I hit the art supply store, I check out their variety and sometimes find myself buying a new type to try out when I paint next. Sometimes, I like the new one and sometimes I find out it was a useless purchase. Let’s see what I currently own:
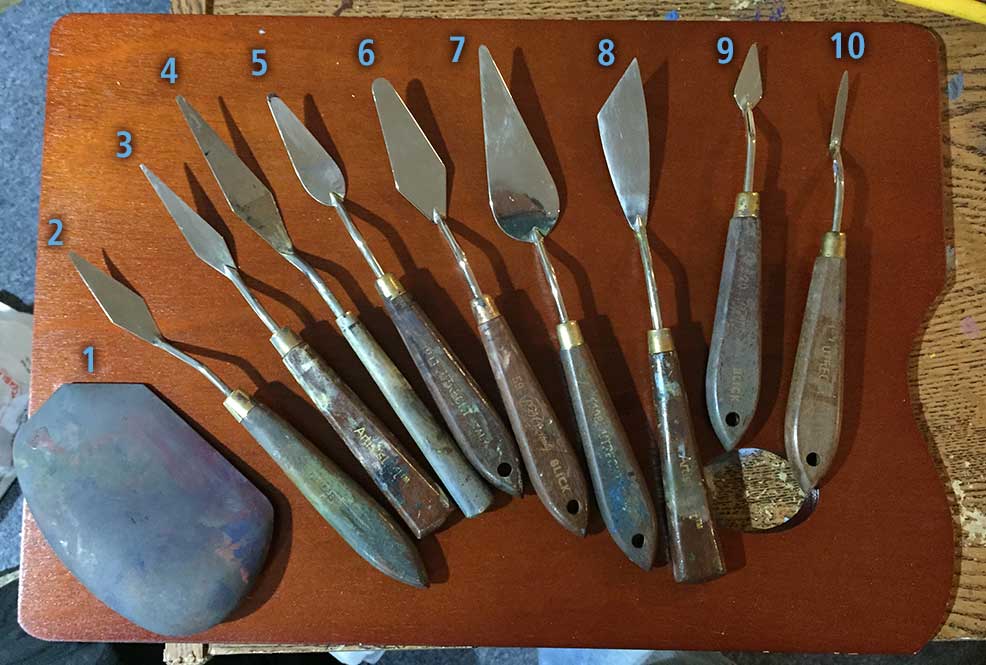
- This isn’t a knife at all, but a nylon wedge. Still, it’s a lot of fun to use to apply lots of paint on a larger canvas or to scrape paint around.
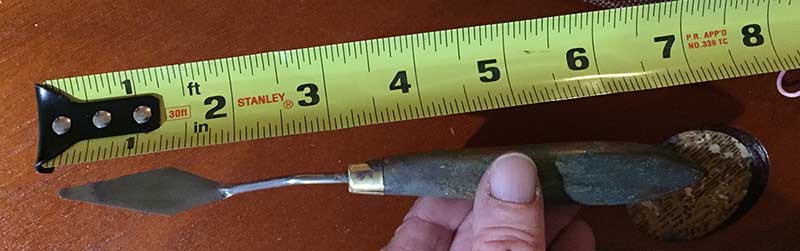
- This was my first knife I ever owned and is my favorite knife of all. I bought it for a beginning painting class in 1987 and it’s still the knife I use the most. I have no idea what size it is. I’ve posted another photo on the top of this blog to show you how large it measures. As you can see, it’s trowel shaped and you can use it like one would use a cement trowel – although on a smaller scale. This would be the knife I recommend you buy first due to its extreme versatility. Since most plein air paintings are relatively smaller than paintings you may paint in a studio, you can easily paint a plein air in 2-3 hours with just this knife. The side edges can give you nice thin lines. It’s also a good knife for mixing paint. I’ve used this knife so much, it’s razor sharp from being scraped on many canvases and panels. And, yes, I’ve cut my fingers on it a few times. Be warned.
- This is a longer version of my favorite knife.
- This is an even longer version of my favorite knife. The longer versions are especially handy if you want to make long thin lines.
- I read this one artist who recommended knives with rounded edges instead of sharp ones, so I bought one. I don’t find I use it very much. I like the sharp edges to help my out with sides of buildings and such.
- This is a larger version of the rounded knife and, again, I don’t find myself using it very much either.
- I do find myself using this large version, though! Especially when I work larger. I love loading this knife up with a lot of paint and going to town scraping and flinging paint fast. It makes for a lively painting and I don’t use this knife enough on my smaller panels when I go plein air. If I allowed myself to loosen up and not worry about small details, I bet I could get a very lively painting in a short time!
- Again, an artist I watched online really enjoyed painting with this knife, but I don’t care for it that much. It’s probably good for doing buildings and such.
- This is a smaller version of my favorite knife. Probably good for details. I use it every so often if I need a small dab of paint.
- I have no idea what this knife is good for. It seemed like a good idea at the time when I was purchasing it, but it holds so little paint, I can’t do anything with it. Definitely avoid this one.
There you have it. Like I said, I recommend knife no.2, although a longer version like nos. 3 or 4 might not be bad to add later. If you want to loosen up or paint larger, go for no. 7 or even the nylon wedge.
As for cost, we always hear you get what you pay for, but I’ve never gone for the most expensive knives. I’ve seen knives online for as much as $60-$90 each. Yikes, no thanks! The ones I buy are about 7 bucks each and they work fine for me. Again, I’ve recently discovered a terrific knife artist who uses only inexpensive plastic painting knives. I’ve never tried them. They look like they would break too easily. Plus they don’t come in the different varieties I’d like.
Well, I sure rambled a lot about knives when I ended up just recommending one kind. As you can tell, I’m pretty passionate about them, though. Here’s hoping you feel the same once you try them. But before you do, I have a few more supplies to recommend for you, which I’ll take care of next blog entry. After that, we get to try them out. See you then!
by John Nagridge | Apr 2, 2017 | Beginning Plein Air Painting
When painting plein air, you want to bring as little with you as possible. This applies to your paint, as well. A limited palette is highly recommended. In my opinion, that would be a tube of each of the 3 primaries, a brown, and white. Here’s some suggestions for a beginning palette. Later on, you may want to modify and/or add to it.
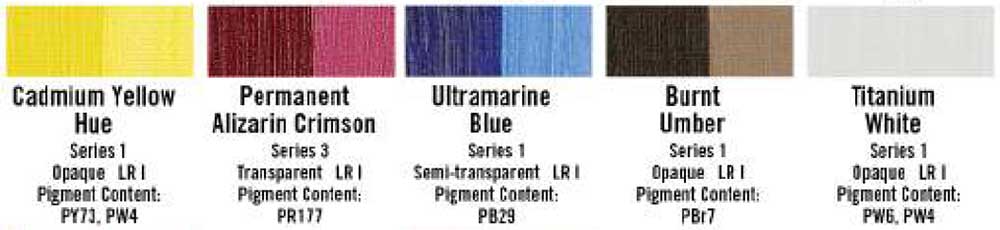
Cadmium Yellow. A good, basic yellow, it makes terrific greens, oranges, and golds. It can be toned down with brown to make nice ochres.
Permanent Alizarin Crimson. A cool, transparent red, it makes nice oranges when mixed with yellow and nice purples when mixed with blue. It’s terrific for darkening and/or toning down your greens.
Ultramarine Blue is a very versatile blue to start with. It plays well with the other colors, making nice greens and purples. On its own, it mixes well with white for your sky blues.
Burnt Umber. I like to include an earth color and burnt umber would be the one I’d start with. Again, it’s versatile. Mix it with blue and you get a terrific black. Add white to that mix for nice grays. Add more burnt umber to the gray mix for a warmer gray; add more ultramarine blue for a cooler gray.
Titanium White is a terrific opaque white. I can get chalky looking if overused, so I personally like to buy white that’s a blend of mostly Titanium White and some Zinc White. Do not buy Zinc White on its own. It’s very transparent and won’t lighten your colors unless you use a whole lot. Zinc White by itself is best left for hardcore studio artists who use it for luminous effects like skin in their portraits.
Once you have these colors and have worked with them a few times, you may find you’ll want to add colors to your palette. For instance, I sometimes use a warm red like Cadmium Red instead of Alizarin Crimson. Mix a little into greens to get interesting olive colors. Sometimes, I’ll bring some Sap Green or Viridian if I know I’m going to use a lot of green in my painting. I often use Burnt Sienna instead of Burnt Umber if I want warmer browns in my scene. The more you paint, the more you’ll figure out your own favorite limited palettes.
If you don’t have any paints at all yet, you can buy paint sets to start out. Here’s a 6-color set from Blick that costs less than $15.
Some final thoughts:
- Whatever paints you do end up getting, make sure they’re not student grade versions. Seriously, go for the good stuff. Student grade paints don’t have the level of pigments the professional stuff has. You’ll find yourself getting very frustrated when your paints don’t cover the layer below well.
- When picking out any colors, look on the label for its Lightfastness Rating to determine how permanent the color is. Make sure it says I. Stay away from II or III. Those colors may fade or change on your painting after time.
- Stay away from Pthalo Green, Pthalo Blue, or Prussian Blue at first. Those paints stain like crazy. Once you apply them to your painting and then try to paint over them, you’ll find those colors will stain anything they come in contact with. If you do use them later on, use them sparingly and carefully.
- No need to buy black. Mixing Ultramarine Blue with Burnt Umber or Burnt Sienna makes a richer black. No need for oranges or purples at first either. It’s always better to learn how to blend them at first. Later on, if you feel the need for them, you can always buy them.
- If you like paint texture, try to find a brand with thicker paints. I personally love the Utrecht line of paints due to their reasonable prices and thick paint.
- Don’t buy any paint mediums. They’re not needed for beginning plein air painting. When you get the feel of it, then you can explore mediums that suit your needs.
- Knife painting can use a lot of paint. Once you’ve painted a few and know the colors you like to use, definitely go for the larger tubes. They’ll save you money in the long run.
Next blog, we’ll talk about the painting knives themselves.

Recent Comments