
Welcome to My Blog
The latest news about my art, or just some musings that pop out of my head.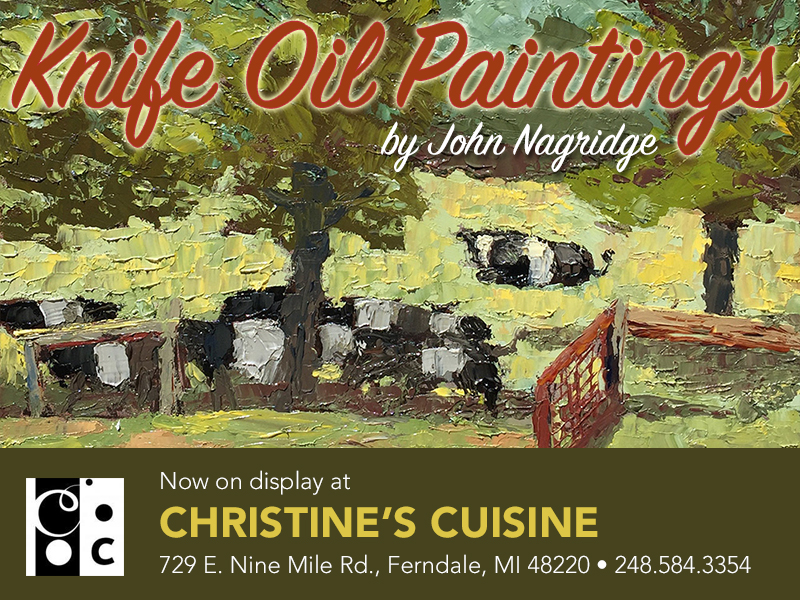
See my paintings and enjoy a great meal in Ferndale
I just hung up about 20 of my knife oil paintings at Christine’s Cuisine. It’s a terrific restaurant in Ferndale, Michigan on 9 Mile between I-75 and Woodward.
I’m especially thrilled to show my work here because the owner is, like me, of Ukrainian descent. If you stop by to see my work (which is all for sale), make sure you stay and enjoy great meal. I can personally vouch for their Ukrainian Combo Platter. Tell Christine and Natalia I sent you.
Playing with Acrylic
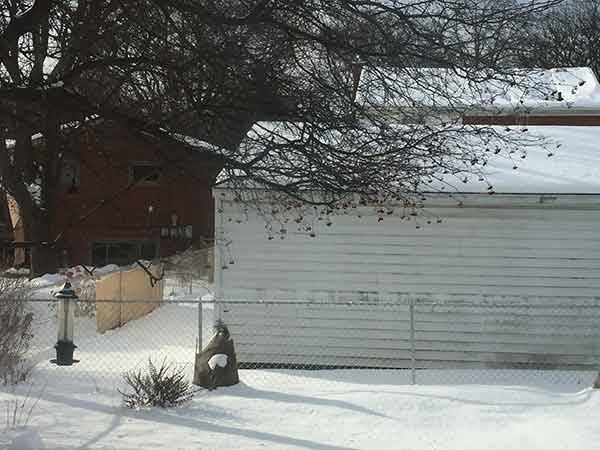
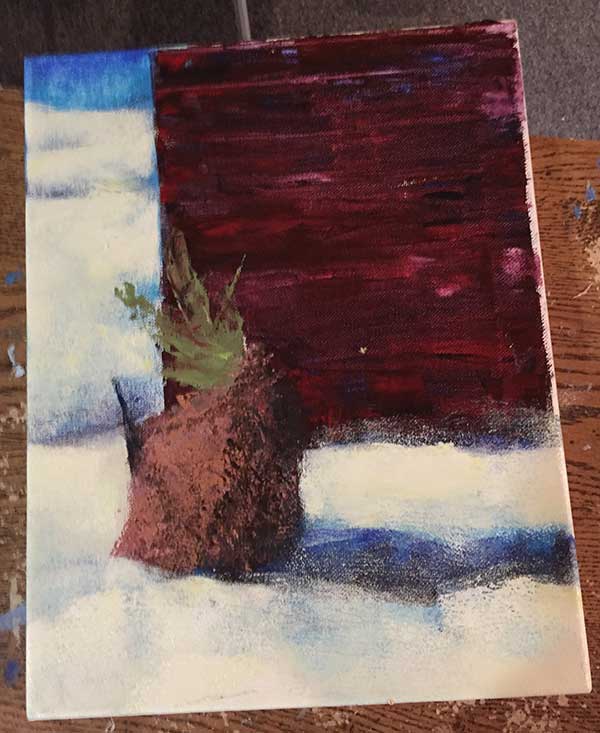
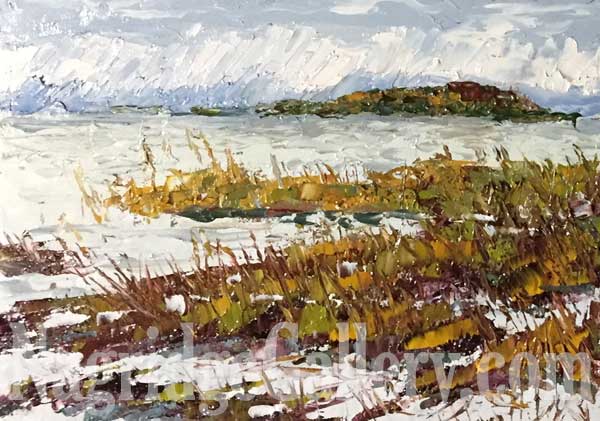
The temperatures this week have been very low. I attempted a plein air yesterday and had to quit after a half hour. Today, I’m playing it smart and doing a painting indoors. I took this photo of my backyard and saw all kinds of possibilities for a painting. An evergreen wrapped in burlap, shadows on the snow, a tree with berries that has snow covering the branches — lots of different subjects to choose from to make a good painting. Like plein air, the secret to a good painting isn’t just what you put into it from what you’re viewing, but also leaving out some of the things you see before you. I decided to concentrate on the small evergreen wrapped in burlap with my neighbor’s garage in the background.
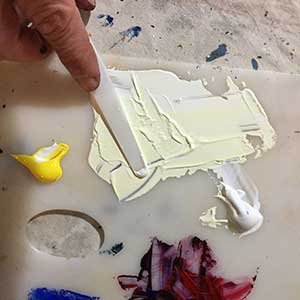
I may be teaching a class in acrylic painting this winter/spring, so I thought I’d do a quick acrylic painting without the use of traditional brushes or painting knives. Acrylic is a very versatile medium that plays well with many fun tools. A lot of these tools can be found at a dollar store. A lot of items you may already have in your household could be used in a creation of an acrylic painting. It’s a medium that encourages one to be experimental with tools and execution.
I ventured around the house and found things like plastic canvas keys, small foam paint rollers, rags, an old toothbrush, sponges, and paper towel. I set up a palette with a few acrylic paint colors. I got a small children’s beach bucket that I used to use when I painted regularly with acrylic, and filled it halfway with water. I also got my spray bottle and filled it with water. A spray on my palette every so often helps keep the paints from drying out.
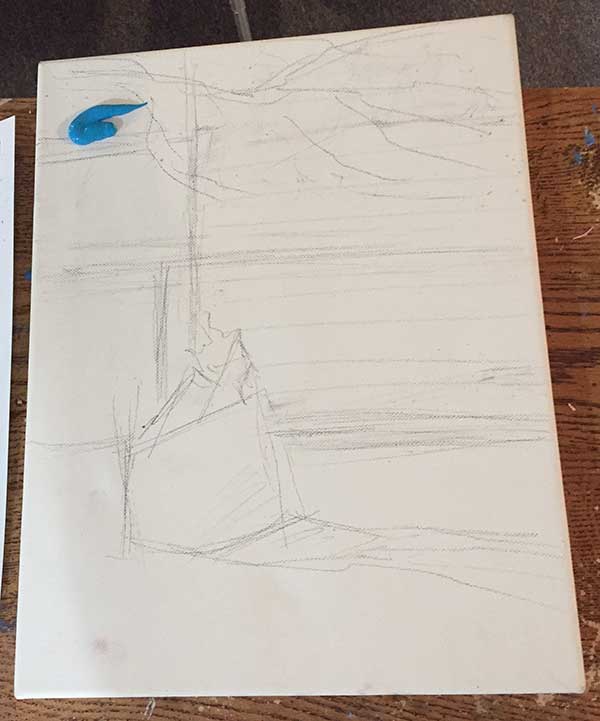
I found an 11′ x 14″ canvas and did a quick drawing with a basic number 2 pencil. I didn’t want to use a traditional art pencil. I wanted to make sure that the only traditional art materials used were the palette, the paints, and the canvas. If I wanted to be complete non-traditional, I could probably have used a piece of cardboard for a palette and all kinds of surfaces instead of a canvas. Acrylic will stick to almost anything.
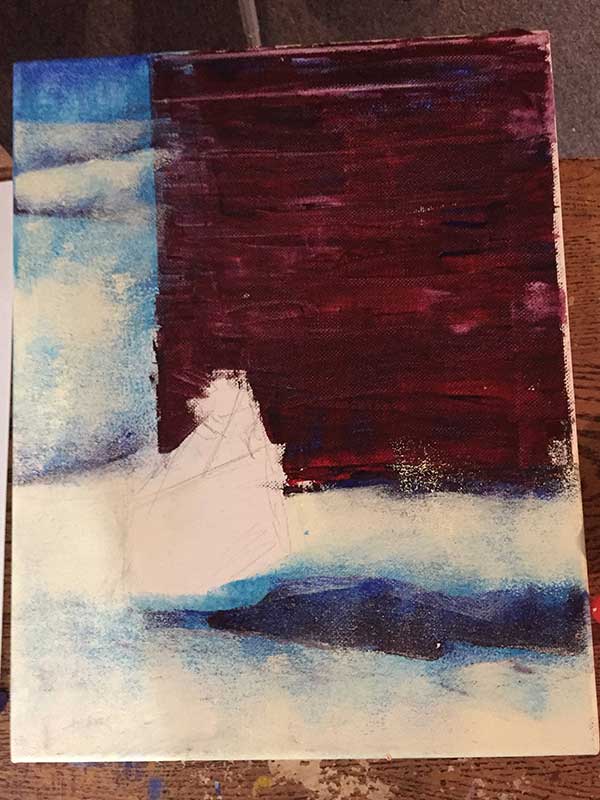
The drawing on my canvas has a lot more elements than I ended up with in the final painting. I included the fence, as well as the tree with the berries on top. At the end, I simplified the composition greatly.
I thought I’d start with the snow. I applied some liquid blue acrylic paint directly to the canvas.
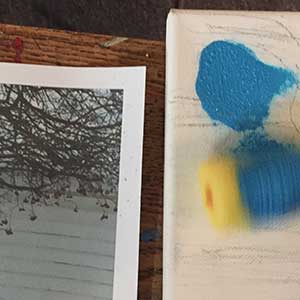
Then I got one of my small paint rollers and applied the blue paint all over the areas of the canvas that had snow on the ground.
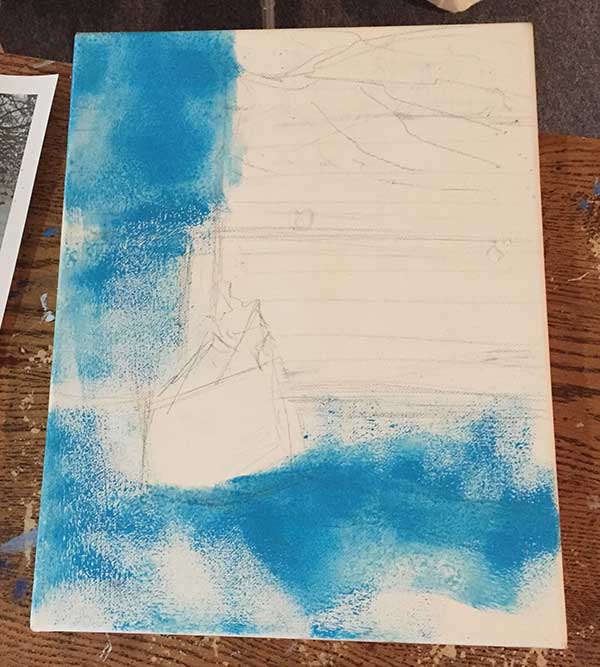
I didn’t try to be too careful with the blue because I knew I would be painting on top of it later on after it dried.
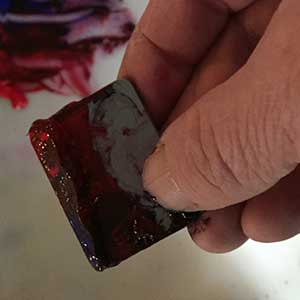
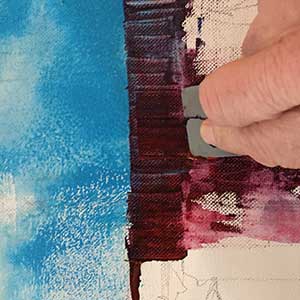
I made a mix of ultramarine blue and crimson using a plastic canvas wedge. I didn’t mix them too thoroughly. In fact, I picked up some blue on one side of the wedge and red on the other. I then dragged the purplish mix all over the areas of the side of the garage. My intention was that the white garage would be in shadow, so I’d start with a dark cool color and then go over it with a lighter version. As it turned out, I liked the color that was applied and left it as is.
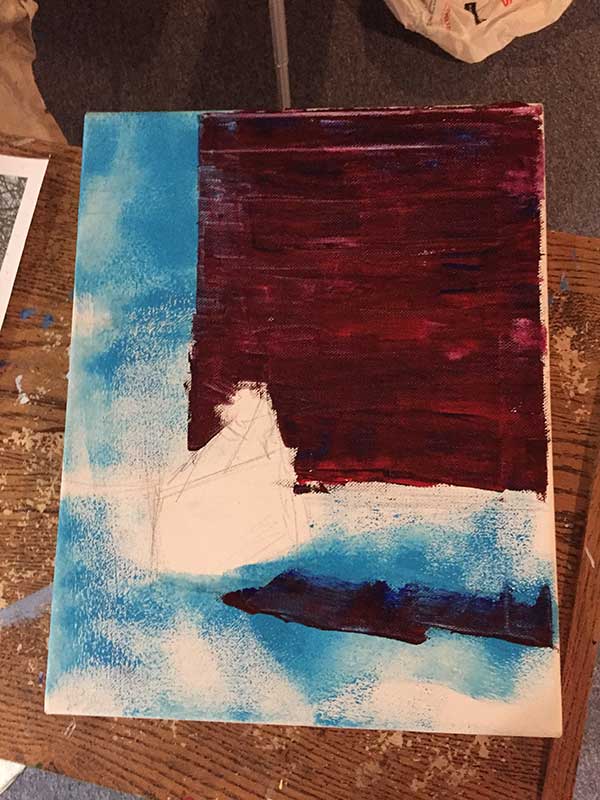
I applied some of the purplish mix as a shadow color for the wrapped evergreen, as well. It looked too dark, but I knew I would be going over it later. The purple provided a nice base.
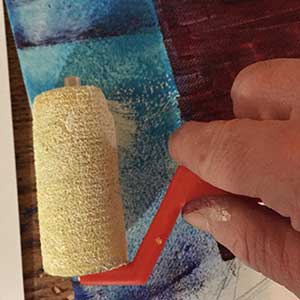
I then took the same roller I used for the light blue and picked up some ultramarine blue from the palette. I took the roller and applied this darker blue to the top of the sky and to the bottoms of the snow hills. When it dried, I got a clean roller and made a mix of titanium white with just a little touch of yellow. With the roller, I applied it to all the snows areas that were not in shadow. With the little paint left on the roller, I added a light coating of it in the shadow areas, as well to remove their harshness.
Add you can see some got onto the left side of the garage. When it fired, I use the plastic canvas wedge to apply and scrape more of the purplish mix to the areas I didn’t want the white coating on. That’s the great thing about acrylic paint. It’s easy to correct quickly.
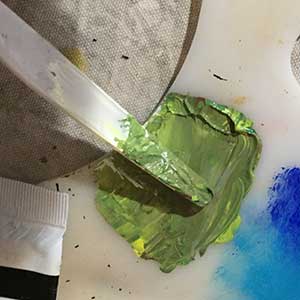
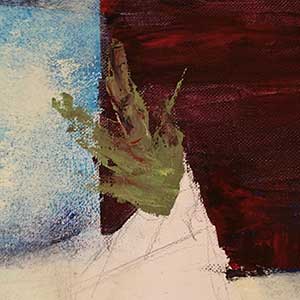
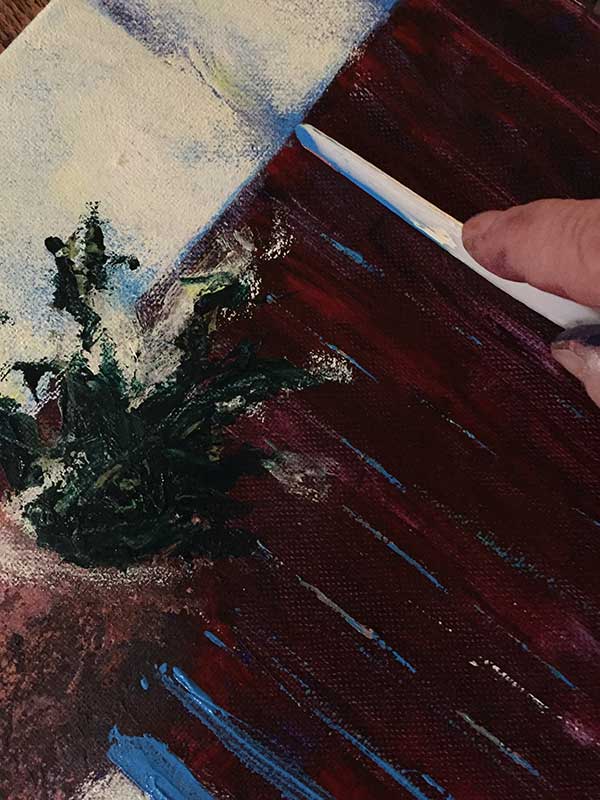
With a plastic knife I found, I mixed a green from the yellow and ultramarine. I added a little red to darken it. Using the same knife, I applied the paint to the canvas to indicate the evergreen sticking out from the burlap wrap.
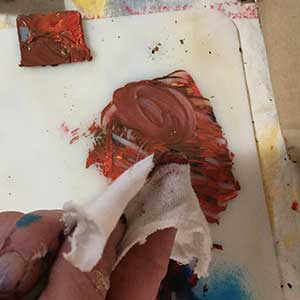
I made a brown from the yellow, crimson, and ultramarine blue and picked some up with a rag wrapped around my finger. Using my finger in the rag, I rubbed the paint into the areas of the burlap wrap.
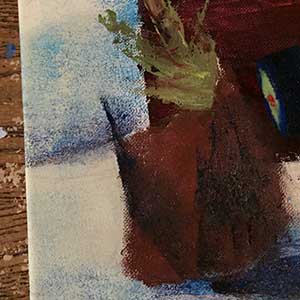
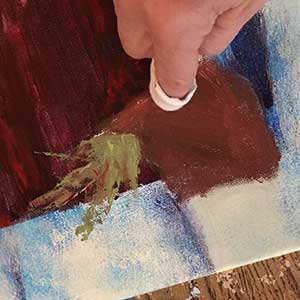
When it dried, I took the roller with the blue paint and picked up some more ultramarine to the roller’s edge. I applied it to the burlap to color the shadow area. I also tilted the roller to the edge and applied it to the left edge of the burlap to indicate the stake sticking out the burlap.
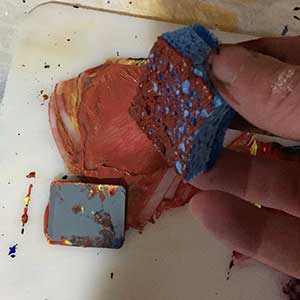
I wanted to suggest the rough texture of the burlap, so, I made a mix of a lighter bown by adding some titanium white to the original brown mix. Using scissors, I cut a piece of sponge. I applied the lighter brown mix to the burlap. I was hoping the sponge would give a texture to simulate the burlap. Unfortunately, that didn’t work as planned. The paint was applied too solid and it didn’t look warm enough. I let it dry and made an even lighter mix, except I added some yellow to it to warm the color up.

This time, I used a dry paper towel to pick up some of the paint. I was more successful getting a texture with the paper towel, as long as I didn’t have too much paint on it.
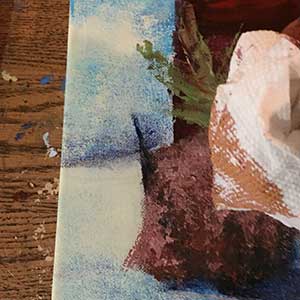
The areas with the snow were still too dark. I made more of the titanium white and yellow mix. I used the same second roller as before with that paint mix and applied to the tops of the snow, as well as over the snow shadows to soften them. The painting really brightened up with the added contrast. I thought the free looked too bright. Also, the garage itself still looked too flat.
The green was an easy fix. I squeezed some Pthalo green onto my palette and darkened it with the crimson. I applied it with the plastic knife on top of the brighter green areas. Now it looked more like our evergreen! Time to work on the garage.
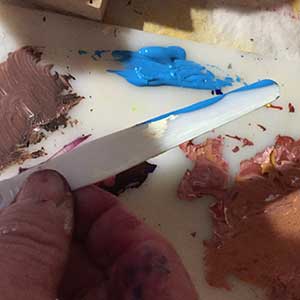
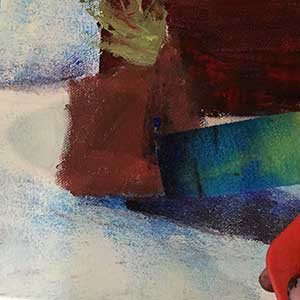
I poured out some more of the liquid bright blue onto my palette. I cleaned my knife off and drew the edge of it into the pile of blue.
I then pulled the knife along the garage to make horizontal lines to indicate snow that got into the grooves of the siding. When the paint stopped coming off the knife, I’d wipe it and draw it through the paint on the palette again. Sometimes, instead of drawing the blade onto the painting, I’d just tap the edge onto the canvas to get a different type of line.
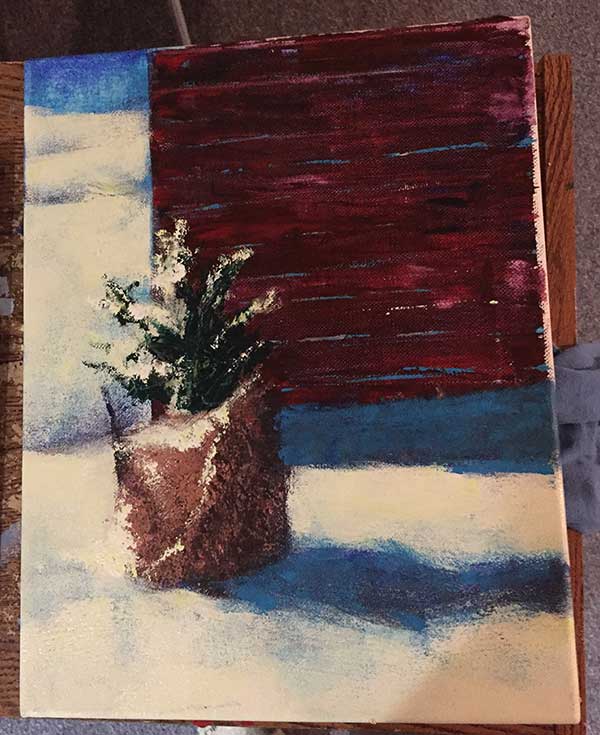
I wiped the knife off and used it to pick up some of the white/yellow mix. I applied it a little thickly onto the evergreen and to the burlap. The painting’s almost done, but I decided to make it a really snowy day.
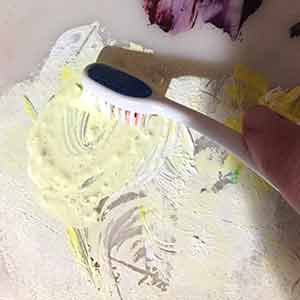
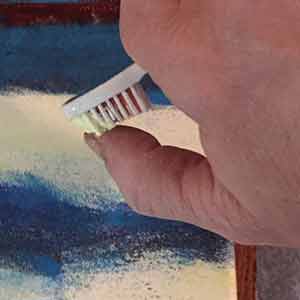
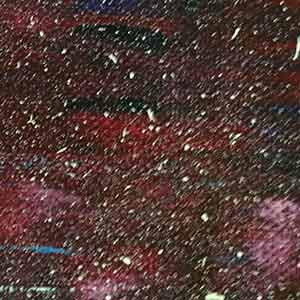
I made a thinner mix of the titanium white and yellow. I mixed it together with a toothbrush. With the toothbrush bristles loaded with paint, I flicked it over the canvas to get a nice uneven spray. I applied it to the entire canvas.
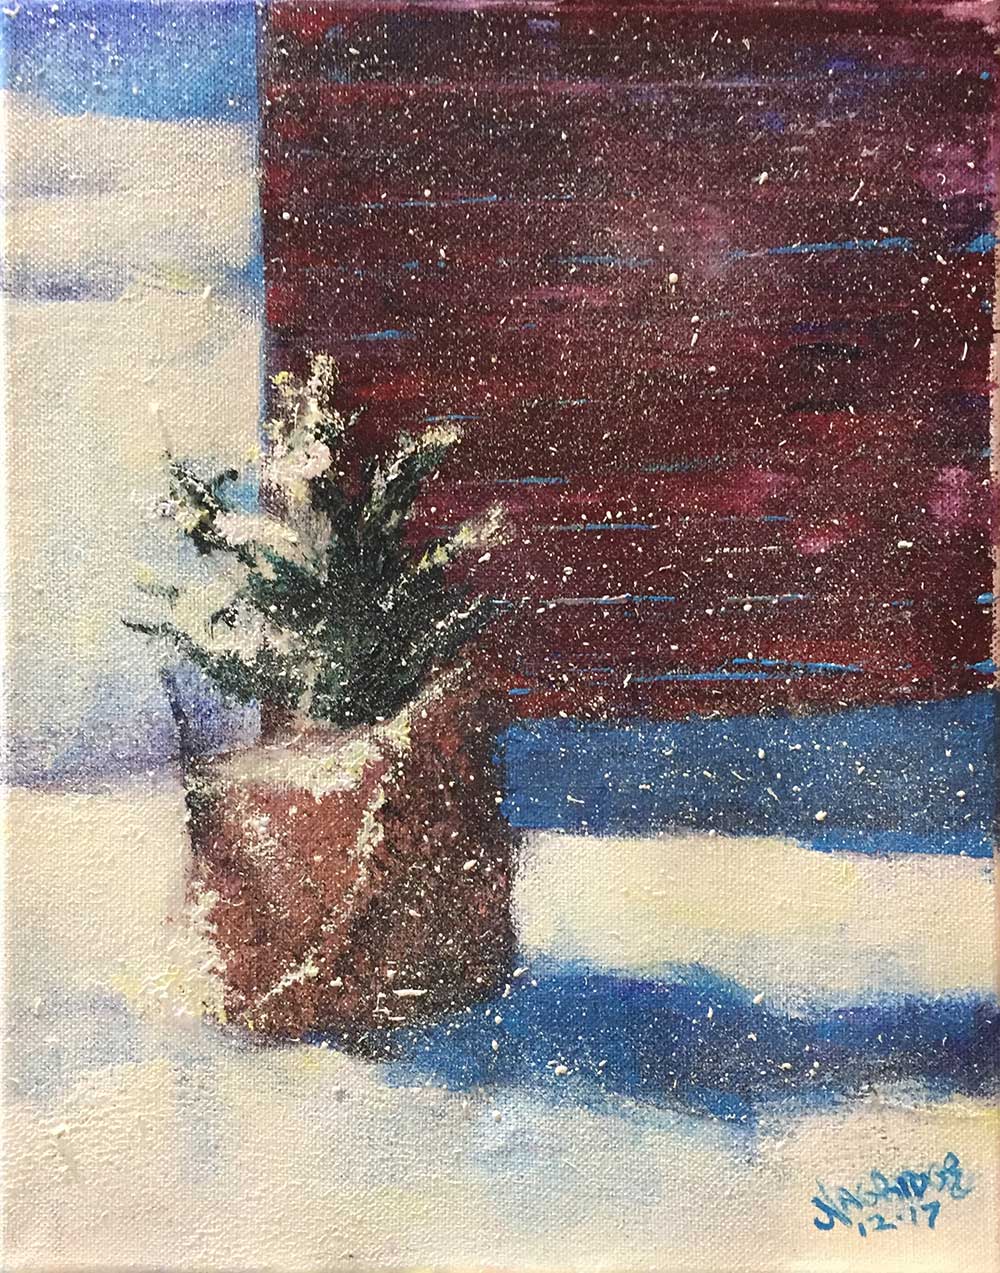
Here’s the final painting, completely in about an hour or so. Acrylic dries so fast, I was able to cover up areas within a couple minutes with each step. And the only time I picked up a traditional tool was when I used a small brush to sign the painting. This was an exercise in fun. I don’t work in acrylic enough and hopefully I will experiment with this versatile medium again soon.
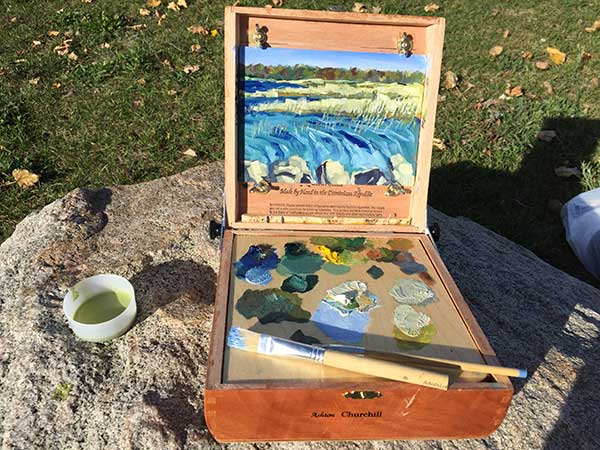
Meet Ashton, my new plein air painting buddy!
When I paint my plein air paintings, I stick with just one size — 11′ x 14″. I got this advice from Stefan Baumann’s YouTube videos. It makes things so easy. I have an EasyL Pro pochade box and a RayMar wet panel box that cater to these dimensions. I still have my old French Easel if I ever choose to work larger. My wife, Tammie, has suggested I also try painting small paintings, but neither easel works well for them.
This calls for a new pochade box!
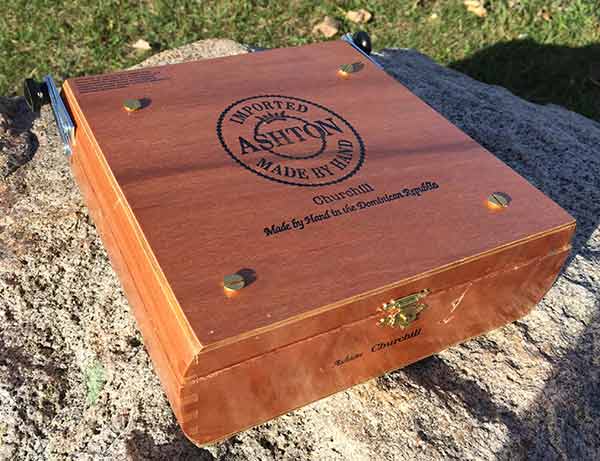
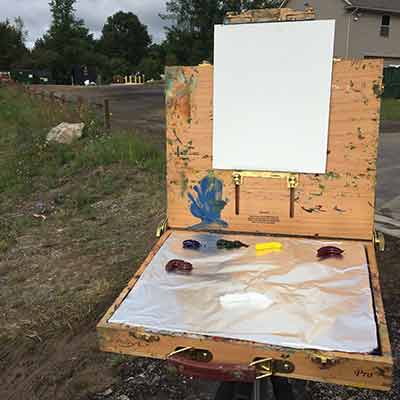
Ladies and gentlemen, meet Ashton, my new portable easel created solely to paint 5″ x 7″ panels! I made him myself after checking out a few links on Google on how to convert a cigar box to a pochade box. Sure, I could just buy one, but that could set me back at least another 70 bucks. No thanks. I’m too cheap, plus building my own easel gives me a feeling of accomplishment and, yes, even a sense of it truly belonging to just me.
First I went to a local liquor store that also specializes in cigars, They were selling empty cigar boxes for only 2 dollars each. (Later, I found another store that gave them away free. If you plan on building your own, call a local cigar seller and see what it takes to get an empty cigar box.) I had my measuring tape with me to investigate each box they had. It was important to me that the box lid was recessed and could hold a 5″ x 7″ panel vertically and horizontally. I wanted the wood to be relatively thicker and sturdier. I wanted a nice deep bottom to hold paints. I couldn’t choose between 2 boxes and bought them both. Once I got home and did more measuring, I realized that the Ashton Churchill box would probably work better.
I then made a trip to the local hardware store for a few supplies. The hardware that comes on cigar boxes can be flimsy. Cigar boxes aren’t meant to be used permanently. I also bought a thin strip of wood.
The Assembly
Once I got home, the first thing I did was measure the insides carefully and cut the wood strip down to smaller lengths that would fit inside the base. I attached them to the sides using wood glue. After clamping the strips to the sides, I let the cigar box sit overnight to dry. The purpose of these strips was to add a lip for a palette to sit on top. Also, the wood on a cigar box isn’t very strong and not that thick either. Adding this strip would allow the sides to take on any hardware I would attached later.
The next day, I cut another small strip so its length and width would work well to the bottom of the inside top lid. It also a little extra wood to take the small screws I needed to attach the hinges with. Again, I clamped the strip and let it dry overnight.
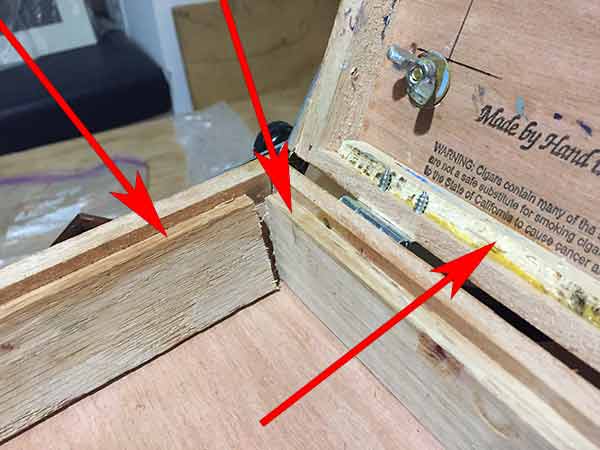
The arrows point to the pieces of wood strips I glued on to help secure the screws later on. The strips on the bottom of the cigar box also provide a lip for the palette to sit on.
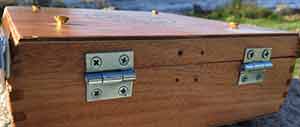
After all the glued on wood was dry. it was time to replace or augment the hardware on the cigar box itself. Cigar boxes are obviously not meant for any kind of permanent use. I marked where the holes of the new hinges would go. Then I drilled small holes at the markings. Then, I screwed the 2 new, stronger hinges to the back. I finished by prying off the flimsy, old hinge in the center.
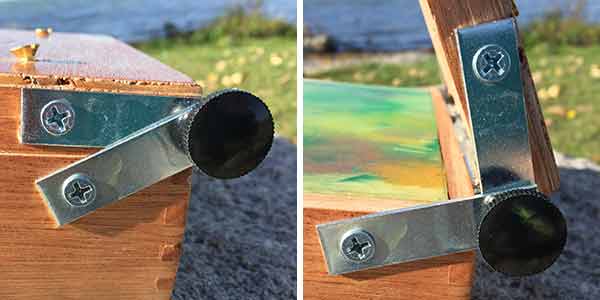
The cigar box now opens and closes more securely, but I needed to secure the lid so it stayed open at whatever angle I wished. I put a bolt in the middle to hold the 2 mending bars together. Then I attached the mending bars to each side, screwing them directly into the cigar box. I finished it by adding a metal washer and then a black screw cap. Now by turning the black screw cap, I could loosen or tighten the bars allowing me to open the cigar box and securing it to whatever angle I liked.
The hardest part for me to figure out what how to keep a panel in place in the top lid. The solution I came up with was drilling 4 holes in the top lid and inserting 4 small bolts. On top of each bolt, I added a larger washer and then a wing nut.
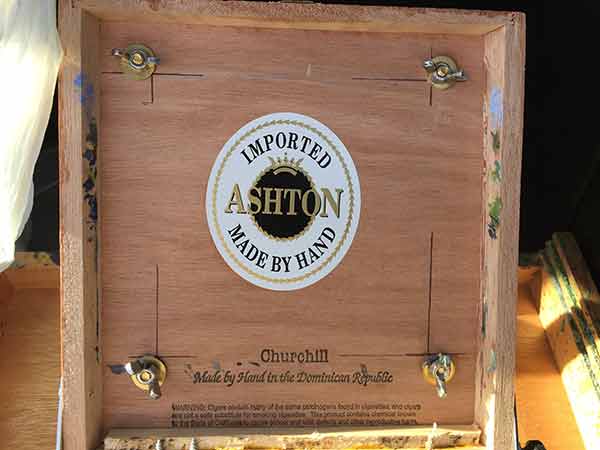
When it’s time to insert a panel, I loosen the wing nut and insert my panel under the washer. Then I tighten the wing nut to keep the panel in place. By measuring the holes carefully, this setup will accommodate a panel placed vertically or horizontally.
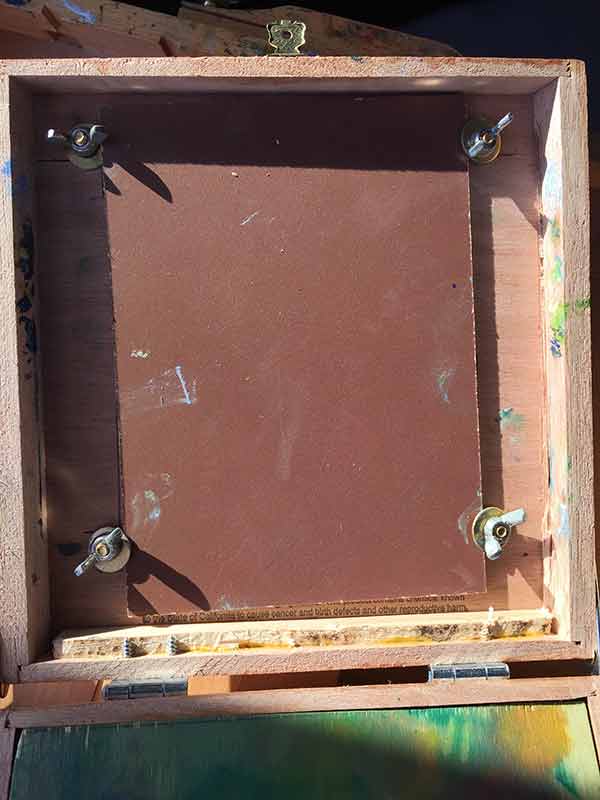
I confess I’m not crazy about this solution. I’ve used the easel 3 times and it’s not working as well as I’d like. I’m going to revisit the links to investigate a better way to keep the panels in place.
To finish the pochade box itself, I drill a hole in the top right of the bottom of the cigar box. This way, I can insert my fingers and let the box rest on my left wrist while I paint.
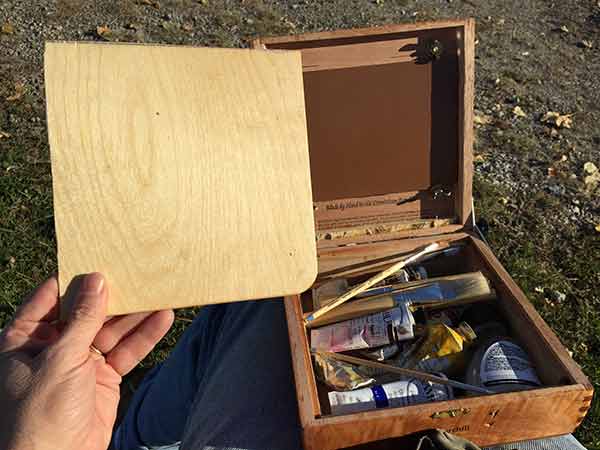
Lastly, I need a palette itself. I found an old palette that I cut down to size so it would sit on top of the lip I made earlier perfectly. I kept the rounded edge, so it would be easy to lift out. I prepped it for painting by brushing 3 coats of linseed oil, letting each layer dry overnight.
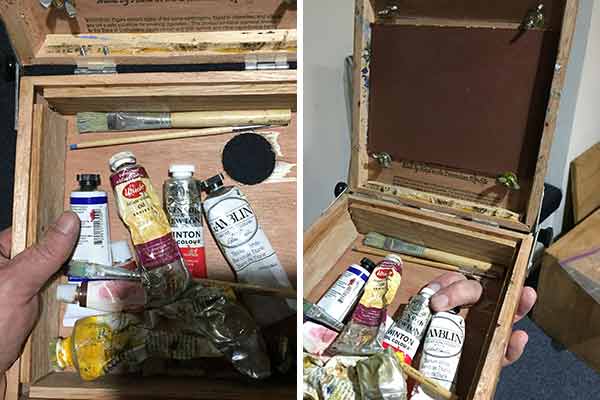
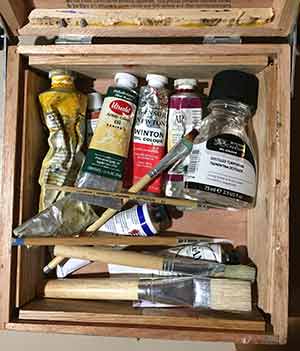
Done! Now I can fill the bottom with the supplies I need to paint. I have a few smaller tubes of paint, narrowing them down to just 6 or 7 tubes. I bought a small bottle of Terpenoid. I found a few half decent brushes and cut their handles so they’d fit into the box. I couldn’t fit a rag or a little container for the solvent, so I did have to have a secondary small bag.
Time to paint
I was very eager to try Ashton out (yes, I calling my pochade box by the name branded on the top lid) and I had my chance last weekend. I took it with me to Mud Creek in the tip of the Lower Peninsula Michigan Thumb. Though, I normally paint with wood, I thought I’d do my first 5″ x 7″ as a brush painting. It’s been years since I painted in oils with a brush that I was eager to see how it would work for me. I actually found it difficult. By thinning the paint with a solvent, it also removed any opaqueness. I found it very frustrating trying to cover up paint with another color. The first layer would seem to swallow it up.
When I finished, I encountered another problem. From what I’ve read, once I’m done painting, I scrape the leftover paint off and wife the residue. After many uses, the residue dries to a nice sheen that will take future paint nicely. Until then, the paint has been absorbing a bit into the wood. When I wiped the palette clean, I got paint all over my hands and clothes. I’m thinking that in the future, I’ll go back to my method of wrapping my palette in foil. Then I can dispose of the leftover paint without the mess. I also didn’t like having to use solvent to thin the paint and clean the brush. I miss my painting knives. As such, my next two paintings were done with painting knives.
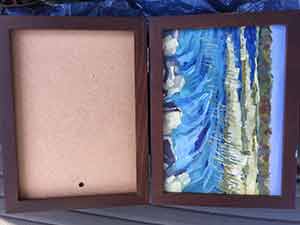
When I was done painting, I needed to be able to transport the wet painting back. I don’t have a wet panel carrier for 5″ x 7″ panels. Artist Rob Kulas gave me a great idea on using inexpensive frames with removable backs for panel carriers. Remove the glass and you’re set. I found this hinged double frame at Michael’s that works perfectly. At less than 10 bucks, I bought two of them, allowing me to transport 4 wet paintings. Plus I get to see what a painting looks like when it’s framed.
So now that you’ve seen Ashton, maybe you’re intrigued to build your own mini pochade box. The end cost for making it ended up maybe $15 at most — a far cry from the $70 an online art supply store was offering for theirs. You can’t get a better pochade box deal than that. It’s easy to transport and use. It takes me about 10 minutes or so to set up my EasyL. This box can have me painting a minute after I open it. The only set up is squeezing paint onto the palette. Another bonus is that I get get a painting done in only an hour. With a box like this, there’s no excuse to get a painting done, even if you don’t have a lot of time.
And the results…
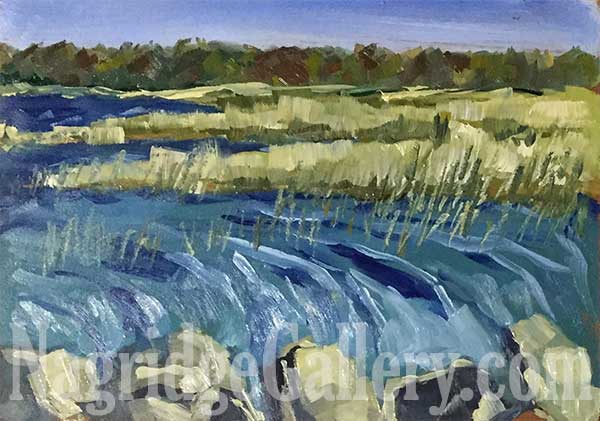
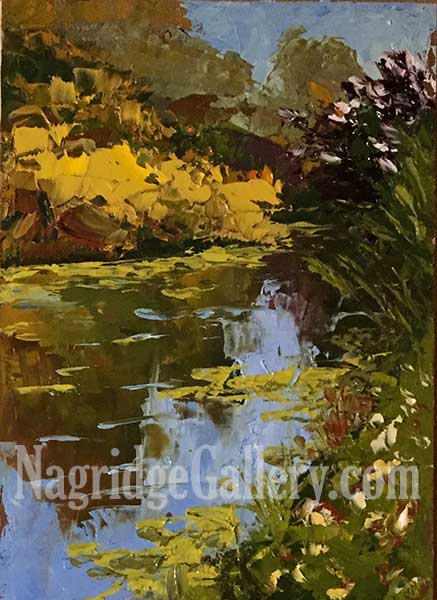
Here are the 3 paintings I’ve done with it so far. The first two all done at Mud Creek, between Bay Port and Caseville, Michigan. The last was done at the boat launch in Bay Port, Michigan.
2017 Paint Dexter Plein Air Festival – the Conclusion
Friday afternoon, August 18, 2017
Dressed and refreshed after a hectic Quick Draw morning, I huddle with the rest of the artists near the entrance. After we turned in our paintings, our juror, Peggi Kroll Roberts, went through the exhibit to choose the prize winners. Now we’re about to hear the results. Fellow painter, Pam Siegfried, was trying to hide, but I made her stand in front of me. I told her, “It’ll be easier to get your award when you win first prize if you’re in front.”
Pam replied, “You’re the one who’s going to win first prize.”
“In that case,” I said, “I’m going to bowl you over when I run to get it!” We both laughed.
There were two categories for the artists participating: Emerging Artists and Professional Artists. To get in the Professional section, you had to be juried in. The Emerging Artists seemed to be first come/first serve. Since this was my first Paint Out and I wasn’t sure what to expect from it, I entered as an Emerging Artist.
Peggy announced the various winners in various categories. Then she announced the Emerging Artist prizes. Third Prize went to Pam! I was thrilled for her. She does beautiful paintings with nice atmosphere. I wish she had a website I could link to so you could see her art, as well. 2nd Prize went to Ronald Farrington Sharp for a very stylized painting of the Dairy Queen in downtown Dexter.
Then Peggi announced the First Prize for Emerging Artist. It was my painting of an apple tree I’d done the evening before! I was dumbstruck. I went up, received my ribbon, thanked Peggi (who told me my painting was charming) and Victoria, and took a couple photos. Tamara Ovall gave me a thumbs up from the crowd. Pam leaned over and said’ “They gave me Third Prize so you wouldn’t bowl me over.” We both laughed again.
What an amazing feeling. I never dreamed I’d win any prize. The other artists’ work is so top notch. To have my work shown with them is a thrill on its own. But winning First Prize is incredible. After the ribbon was attached next to its painting, I took a photo of the ribbon and texted it immediately to my wife, Tammie. She responded back very enthusiastically.
2017 Award winning artists!
Here’s the complete list of the winners, along with links to their sites, if possible:
Plein Air – Professional Artist
1st Prize: Debra Howard, “Beauty by the Side of the Road”
2nd Prize: Jane Flanders, “Big Scary Bush”
3rd Prize: Todd Zuithof, “Mulberries and Cream”
Plein Air – Emerging Artist
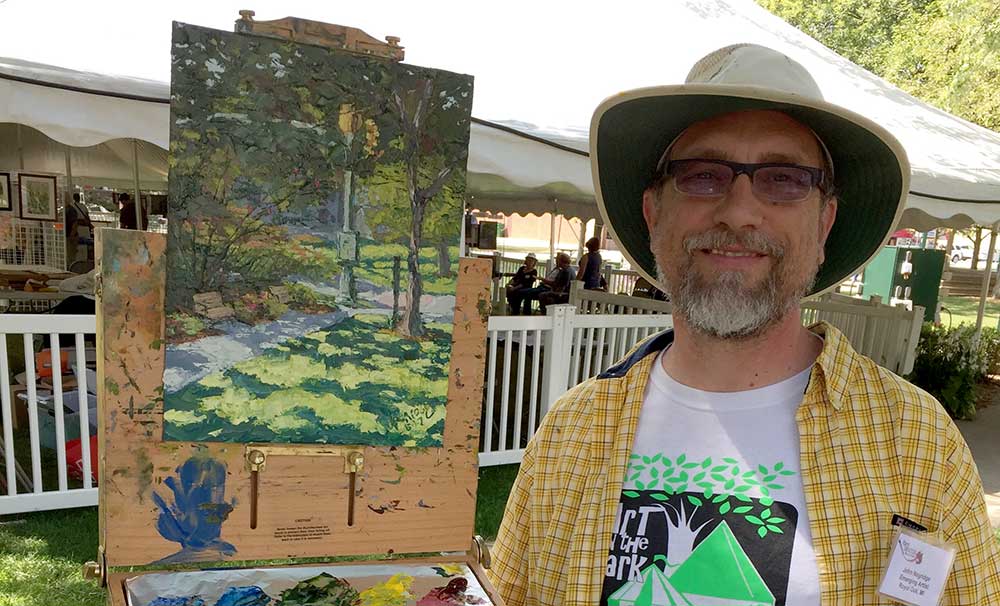
1st Prize: John Nagridge, “A Fruitful Day”
2nd Prize: Ronald Farrington Sharp, “Perspective DQ”
3rd Prize: Pam Siegfried, “Barn III”
Quick Draw
1st Prize, Michael McCleer, “House on Fifth Street”
2nd Prize: Todd Zuithof, “On Deck”
3rd Prize: Martha Elchert, “The Alley on Alpine Street”
Artist’s Choice Award
1st Prize: Jill Stefani Wagner, “Hideaway”
2nd Prize: Todd Zuithof, “Summer Stream”
Best Use of Color in Architecture Award
Judy Kelly, “The Old Mill”
Best Use of Color in a Landscape Award
Mary Hertler Tallman, “Barn Poetry XXVIII”
Best Sky in a Landscape or Cityscape Award
Mary Dice, “Southern Exposure”
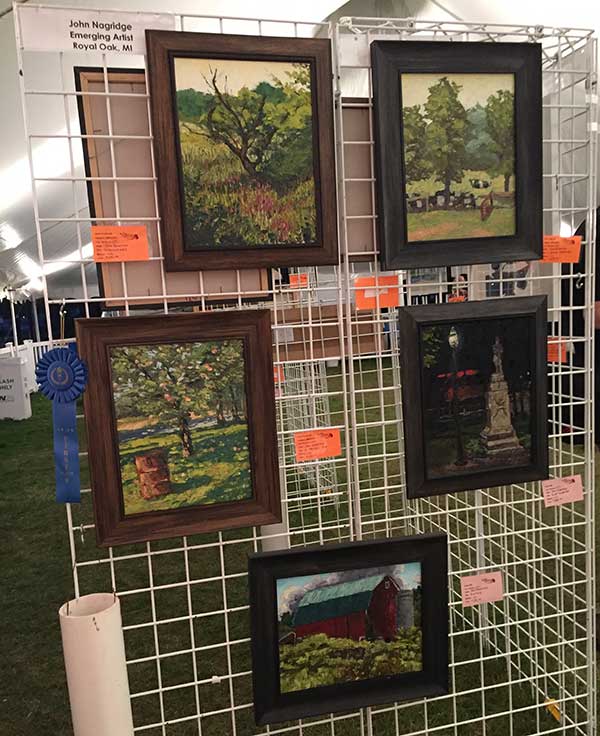
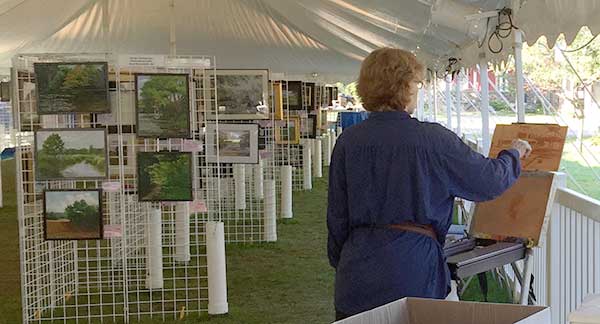
The display wall with the 5 paintings I selected from the group I painted throughout the week at the 2017 Paint Dexter Plein Air Festival..
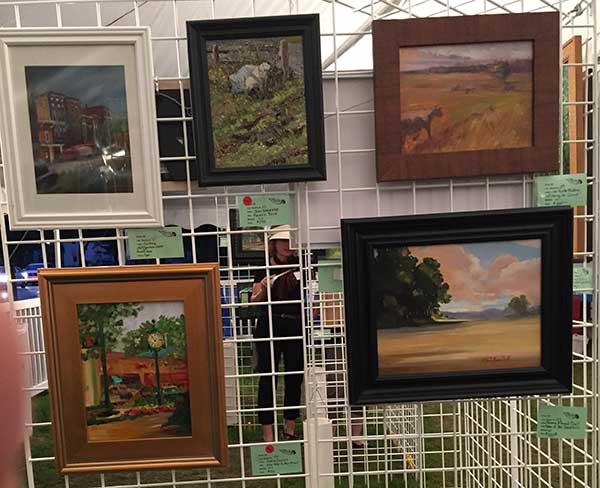
One of the display walls with a few of the Quick Draw Plein Airs. Mine is the top center painting.
As if the evening couldn’t get better, my Quick Draw painting I did in the morning sold within a half hour of the show opening to the public. Unfortunately, I stopped out for a quick bite to eat, and I missed the person who purchased it. She didn’t take it right away, though, so I was able to have it shown for the rest of the weekend.
I spent the rest of the night as a volunteer at the tent, mostly watching the front entrance to greet people, answer questions about the art, and keep people from leaving with wine or beer. I went back to my hotel after a delicious Polish meal at the Whitmore Lake Tavern. What a great day.
Saturday, August 19, 2017
The morning was spent volunteering at the tent some more. I enjoyed hanging out with the devoted volunteers. A lot of them are not artists but give up their time to hang the displays, register the artists and their art, take care of sales and questions, serve, watch the tent, and do a lot more I probably have no idea about. I had a great time hanging out with Victoria, Courtney, Justin, Sanam, Wa, Donna, Angie, and quite a few more whose names I wish I could remember. I also enjoyed some of the best barbecue I’ve ever had at Hotel Hickman Chuckwagon BBQ. And, of course, I walked through the exhibit multiple times. I tell ya, the paintings in this show were really top notch. I am extremely proud that my work hung alongside art of this caliber.
By the afternoon, I started getting visits from dear friends, my wife, and my mother-in-law. After they left, the evening was spent volunteering.
My plan for Sunday was to continue volunteering until it was time to take my art down and go home. But artist Priscilla Olson had a better idea. Last year, she did a plain air near the tent, even though the painting would not be featured inside the tent. It was just a way to get more painting in. That sounded great to me. I still had panels left and would love to get one more plain air in. Victoria asked if we’d do it close to the entrance of the main tent to help draw more visitors in. That sounded great to me! The tent closed for the night and I went back to the hotel, exhilarated from another great day.
Sunday, August 20, 2017
I’m a morning guy. Like I did most of the week, I got to the tent early. Priscilla was already set up inside the tent.
Artist Priscilla Olson already hard at work on her last plain air of the Fest. Unfortunately, I wasn’t able to get a photo of her finished painting.
I didn’t want to paint the same scene she chose, so I set up near the entrance outside the tent. Here’s what I ended up with.
I finished it about the time, the exhibit was closing. About that time, Victoria bought one of my paintings. Her daughter was admiring the first painting I did for the Paint Out of the solitary, gnarled tree surrounded by wildflowers, so Victoria bought it as a present for her. A perfect ending for one of the most perfect and unforgettable weeks I’ve ever had.
So will I ever do another Paint Out? The answer would be yes. I had my second one already scheduled the next weekend. I’ll tell you about it next time.
In the meantime, you can see some more photos from the Paint Out on the Paint Dexter Facebook Page.
Thank you!
I’d like to thank Victoria Schon for running such a terrific Paint Out. I can’t wait to see her and all the other terrific artists in Dexter next year.
Thank you,Tamera Ovall, Cornelis vanSpronsen, Janice Dumas, Pam Siegfried, WanChuan Kesler, and Jill Stefani Wagner for letting me paint alongside you guys. Janice and Tamera, thank you also for answering all my questions about a paint out.
Thank you, Tammie, my wife, for encouraging me to do this.
Thank you, City of Dexter for being such a terrific host.
2017 Paint Dexter Plein Air Festival – Day 5, Part 1
Friday morning, August 18, 2017
Busy morning! I head back to Monument Park in downtown Dexter to turn in the 5 framed paintings I chose to submit. Then I get a gessoed panel stamped on the back for the Quick Draw. The Quick Draw requires the participant to go to a location within the Dexter School District, do a plein air painting, frame it and have it ready to hang, and submit it back to the main tent between the hours of 9:30 am through 1:30 pm today.
I don’t know why I was so nervous about this. I typically spend about 2 1/2 hours on a painting, so the timing shouldn’t be a problem. Still, I decided to work slightly smaller to help guarantee getting a finished painting done. I have a nice 8″ x 10″ panel I bought from Black Art Supplies the day before. It was till early at this point (around 8:15 am) and I wasn’t allowed to start until 9:30. I took advantage of this time by scouting for locations.
What to paint?
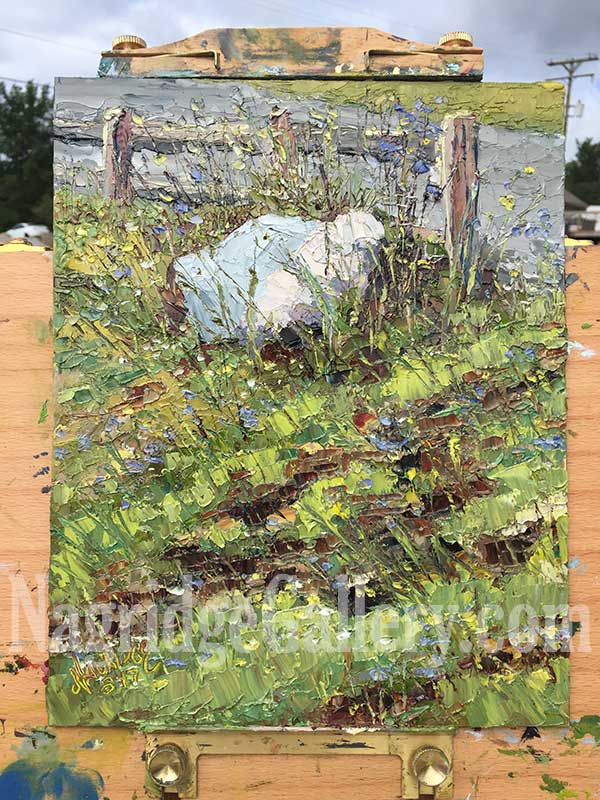
I still wasn’t sure what I wanted to paint. Dexter has a lot of inspiring locations. After driving around the downtown area, I go back to two locations I’d painted at already First, I go to the old barn. I’d gotten 2 paintings done there already. Could I coax a third one out? I take some photos to study later, then head to Haley Mechanical where I did my first painting on Day 1. I recalled there was a neat large rock surrounded by wildflowers next to a wooden fence. I checked in for permission to paint and the crew there was most enthusiastic about my return. I looked at the rock again and knew this would be my subject.
At this point, it was 20 minutes until I could start. Plenty of time still. After the easel was set up and the panel attached, I squeezed my paints on my palette and set the timer on my phone for exactly 9:30. I didn’t tone my panel this time, opting to try a painting on a white background.
I passed my time looking at the scene through my viewfinder. I knew it had to be a vertical composition because I’d already rigged my frame for that format. Most of my paintings that week have been done that way, so I figured that would be the composition I’d be more comfortable working in. I was trying to make the mechanics behind the Quick Draw as simple as possible so I could concentrate on the painting itself.
Time to paint!
My phone timer beeped. 9:30! I got out my acrylic paint marker and carefully did my sketch while looking through my viewfinder I held in my left hand. When I was happy with the sketch, I put the marker away and got out my trusty palette knife.
I don’t remember anything really after that. The right side of my brain kicked in and my hand seemed to move with a life of its own. A week of painting multiple paintings a day honed my skills to this point where I didn’t have to think about what I needed to do. The colors got blocked in quickly all over the panel, and then the values, forms, color temperatures, etc. got modified. In the last 15 minutes or so, I added detail and made corrections where I felt it needed.
Then I finished. I looked at my painting and didn’t see anything I wanted to change. I was happy with it as is, so I signed it. I looked at the time. I’d worked on this only 1 hour and 45 minutes! I signed it and took this photo of it.
Then I quickly moved it into its frame. I took down the easel and put all the painting supplies away. When I was cleaned up enough, I fastened the panel into the frame and wired it for hanging. Halfway into my painting, a couple of the Haley Mechanical employees stopped by to see my progress, so I was eager to show them the finished painting. They were very complimentary of it and a few of them posed with me for this photo.
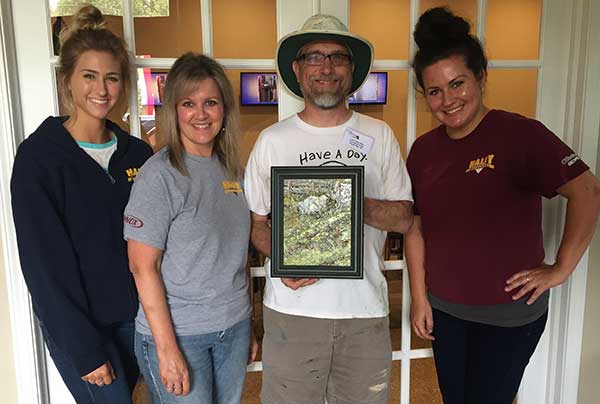
The wonderful and friendly staff at Haley Mechanical posed with my Quick Draw. From left to right: Stephanie Meier, Linda Slater Cooper, me, and Shelbi Polidori. Thanks again for letting me paint at Haley!
I returned to the main tent and submitted my Quick Draw. The volunteer staff were already hanging the rest of the paintings. I wasn’t needed until 4 or so for the awards ceremony. I went back to my hotel to change and grab a quick nap. The painting part of my Dexter week was over.
Next:

2017 Paint Dexter Plein Air Festival – Days 3 and 4
Wednesday morning, August 16, 2017
A day of camaraderie. The morning begins with a full breakfast sponsored by and located at the Riverview Cafe in downtown Dexter. Then, I join a group of fine artists, including Tamera Ovall, Cornelis vanSpronsen, Janice Dumas, Pam Siegfried, and WanChuan Kesler to a farmhouse north of town.
I was happy with it, for the most part, except for the cloud on the upper left. That’s okay. It was still only around noon and there’s lots of daylight left for more painting.
Wednesday afternoon, August 16, 2017
After a quick lunch, the next stop was a pasture with beautiful Belted Galloway Cattle. I’ve been driving past them quite a few times the days before and was thrilled I had a chance to paint them. At the show on Friday, I saw my feelings were shared by the other artists, because there were quite a few paintings of these distinctively-patterned cattle. Below is the group of the 4 talented artists I painted with.
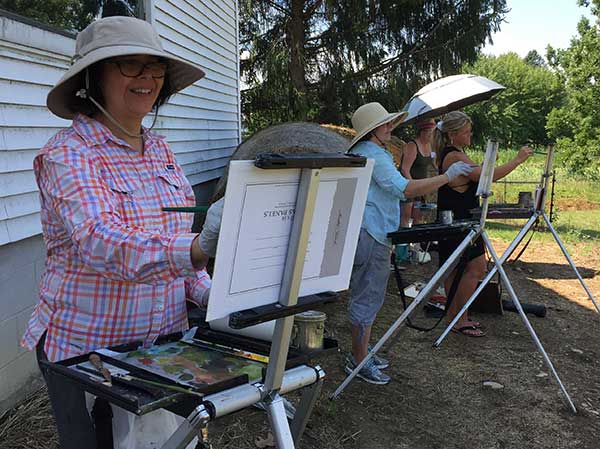
Hard at work painting are (l to r) WanChuan Kessler, Pam Siegfried, Janice Dumas, and Tamera Ovall.
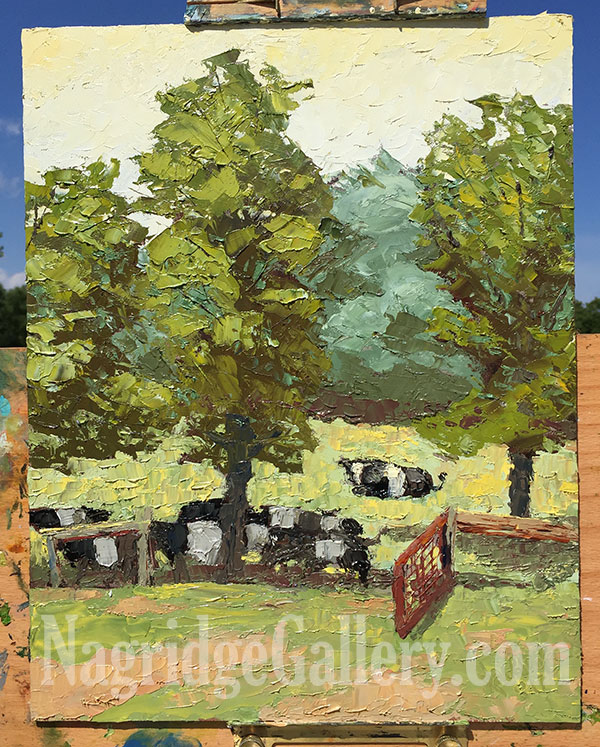
Here’s the painting I ended up with. I think it’s my personal favorite of all the ones I did in Dexter.
Wednesday evening, August 16, 2017
But two paintings weren’t enough for me. This would be my last day to paint for the Dexter Paint Out, aside from the the Quick Draw. Tomorrow, the weather calls for rain and I have to get my work framed for submissions. If I want to do any more painting, it would have to be today.
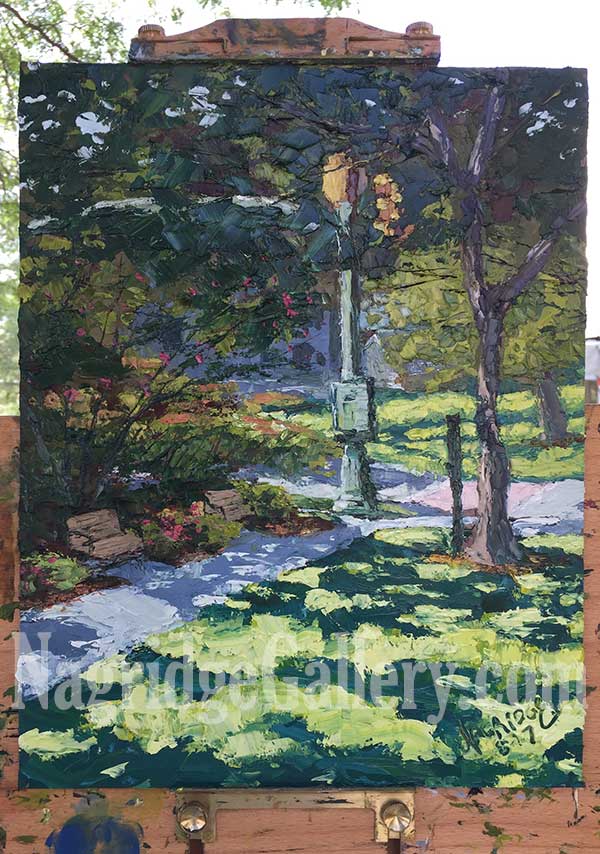
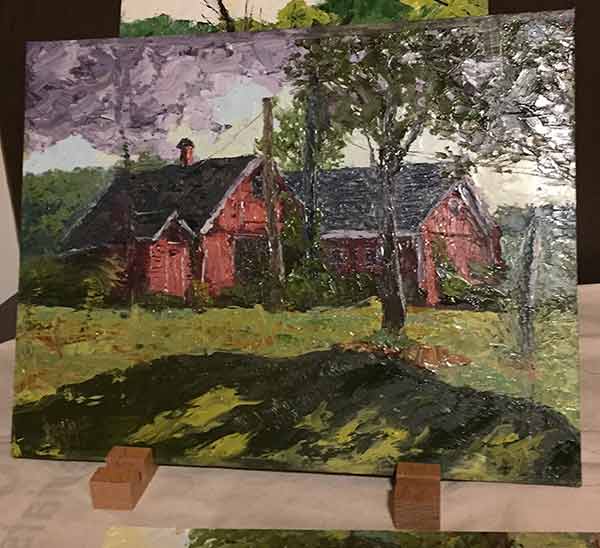
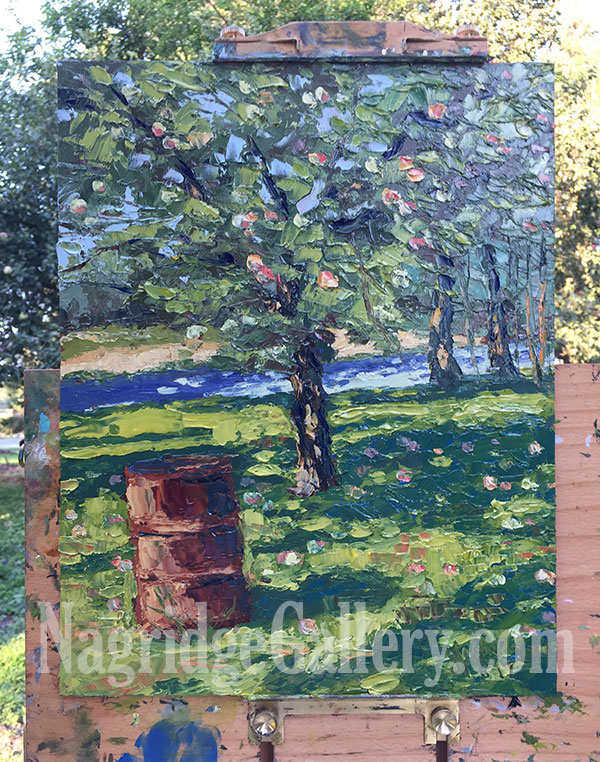
I went on my own, this time, back to the abandoned barn I painted on Tuesday morning and scoped it out again. I settled on an apple tree with ripe and semi-ripe fruit throughout its branches, as well as quite a few that had fallen to the ground. By this point, the sun was on its way to begin setting, so I knew I better get my initial shadows in the painting set. Painting the apples themselves with their blends of yellow, tree, and pink was a lot of fun. Here’s my finished painting on my easel.
I felt a thrill that I was able to get 7 paintings done to choose from. Now to narrow my choices and get them framed. I was emotionally exhausted, as well as very hungry. All that would wait for tomorrow. Time to pack up, get a late dinner, and then rest.
Thursday, August 17, 2017
And the Lord smiled upon the Paint Dexter Plein Air Fest. And He granted perfect weather for the week. The sun has shone throughout my painting week, except for rain on Thursday, which was perfect timing. Thursday is the day I committed to staying in my hotel to frame the paintings I’d done the past 3 days.
I signed up to submit the maximum of 3 paintings and I made sure I was prepared with the proper amount of frames I picked up at Frames Unlimited in Troy. At the event, I was reminded that I was also allowed to submit 2 more paintings as reserves. That meant a quick trip to Frames Unlimited in Ann Arbor. Once I was back in the hotel room, I assembled my favorite 5 out of the 7 paintings I had so far. The task was made quite easy thanks to the Logan Frame Fitting Tool I bought at Dick Buick. (I can’t rave about this tool enough.) I pack my car with the paintings still wet, but framed.
I then prepare for the Quick Draw. Since I have to submit that ready to hang, I get the frame assembled with the D-rings with one of them wired. I settled on assembling it as a vertical frame, so I have no choice but to do a vertical painting tomorrow. I put my frame fitting tool with the pack of point inserts. Even though I shouldn’t need it, I pack my drill and tools I used to do the framing throughout the day, just in case. The easel, panel, paints, umbrella, tripod, etc. are all checked and packed, as well.
Recent Comments